RevenueCat Google Play 集成概述
0:03:00欢迎来到 RevenueCat 的 Google Play 集成 Codelab!
在本 Codelab 中,您将学习如何:
正确配置 Google Play 上的产品。 设置 RevenueCat 仪表板并将其连接到您的 Google Play 产品。 理解产品(Product)、Offering、Package 和权益(Entitlement)。 使用 付费墙编辑器 创建付费墙。
完成本 Codelab 后,您将能够在 Android 应用中无缝实现应用内购买和付费墙之前,完成关于 Google Play 和 RevenueCat 仪表板的所有必要设置。
为什么选择 RevenueCat?
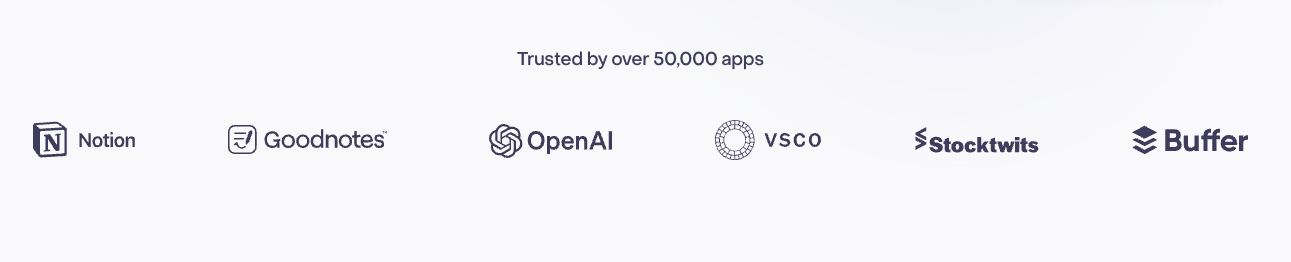
全球领先的应用都依赖 RevenueCat 来支持应用内购买、订阅和付费墙,管理客户数据,并在 iOS、Android 和 Web 上增长收入。RevenueCat 每年处理超过 80 亿美元的应用内购买,受到 OpenAI(ChatGPT)、Notion、Buffer 和 Goodnotes 等顶级公司的信赖。
为什么这么多开发者选择 RevenueCat?
RevenueCat 简化了跨平台应用内购买,同时提供统一的分析数据源。它帮助您更好地了解生命周期价值(LTV)、收入趋势和用户行为——实现更智能的变现和更快的增长。主要优势包括:
统一用户身份:可靠地将购买与您自己的用户 ID 关联,解决应用级别和商店级别账户之间的断开问题。 简化订阅管理:抽象化平台特定的限制,即使在直接控制有限的情况下(例如在 iOS 上)也能提供一致的订阅行为。 跨平台分析:获得标准化的实时洞察,比 Apple 和 Google 控制台的延迟数据更清晰、更具可操作性。 准确的定价洞察:准确了解用户支付了多少,涵盖所有地区和商店,即使原生框架无法提供这些信息。
使用 RevenueCat,您的应用变现变得更简单、更智能、更具可扩展性。
设置 Google Play 产品
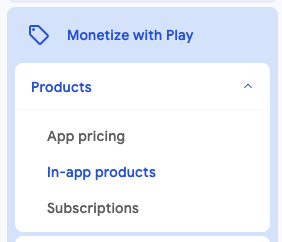
0:05:00首先,登录 Google Play Console,选择您的应用,然后导航到侧边栏中的 通过 Play 获利 > 产品,点击 应用内商品 或 订阅,如下图所示。
基本上,您可以在 Google Play 上创建两种类型的产品:应用内商品 和 订阅。
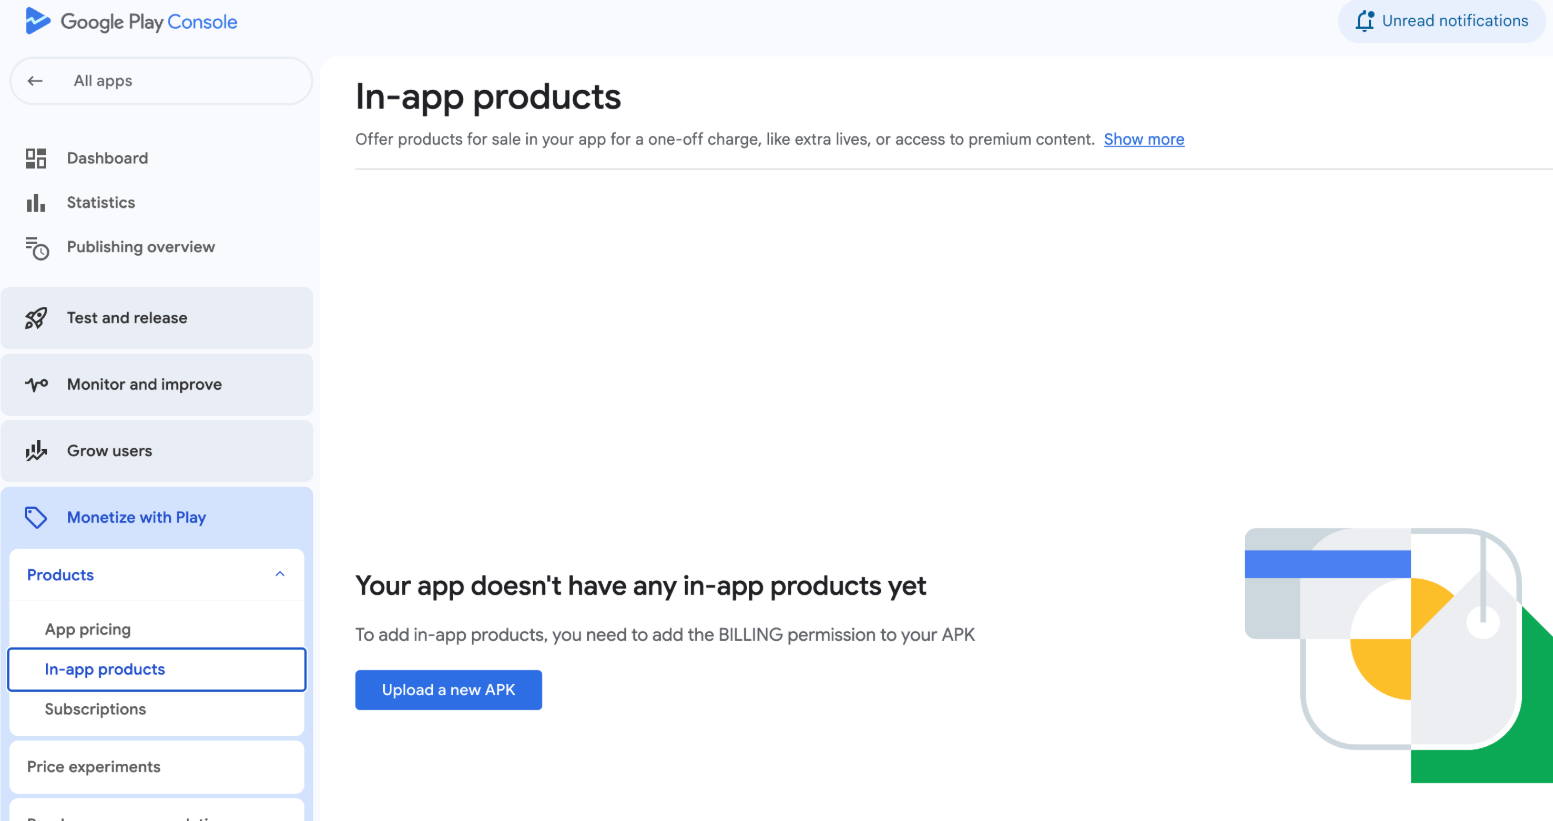
如果您还没有上传任何 APK,如下图所示,您应该先上传 APK,然后再设置产品。您可以通过导航到侧边栏中的 发布 部分来上传 APK。
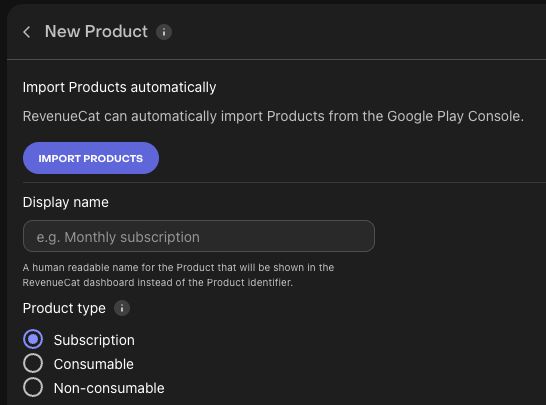
应用内商品
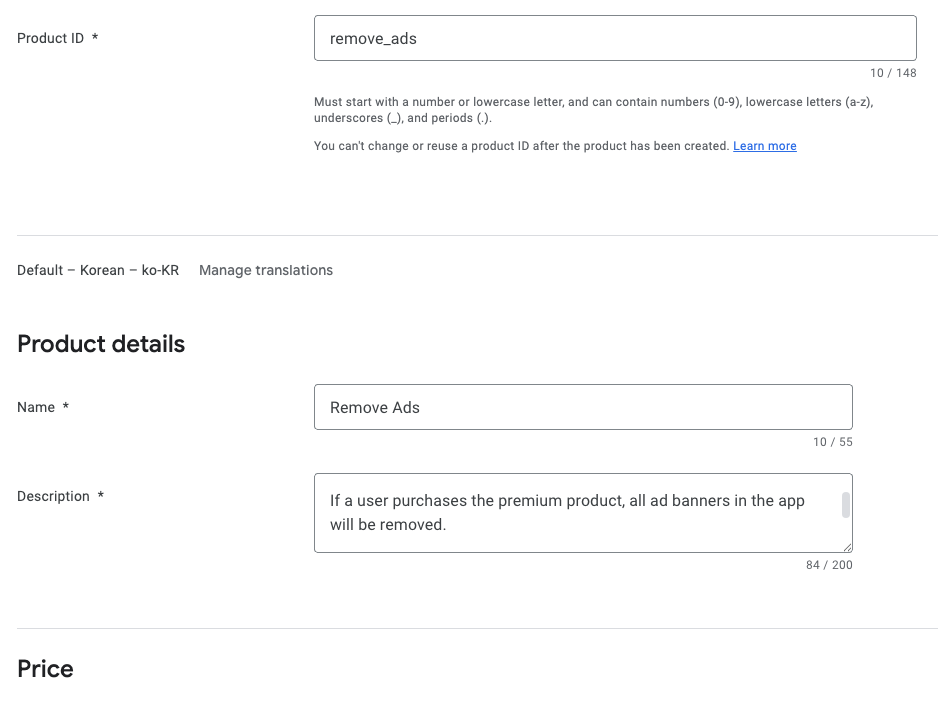
这些是一次性购买,可永久解锁功能或内容。例如去除广告、解锁高级功能或购买游戏内货币。
当您点击侧边栏中的 应用内商品 时,您将看到上面显示的屏幕,您可以在其中创建用户将能够购买的新应用内商品。
订阅
订阅提供按月、按年或自定义周期收取定期费用的内容或功能访问权限。它们非常适合流媒体内容、高级应用访问权限或定期更新的功能等服务。
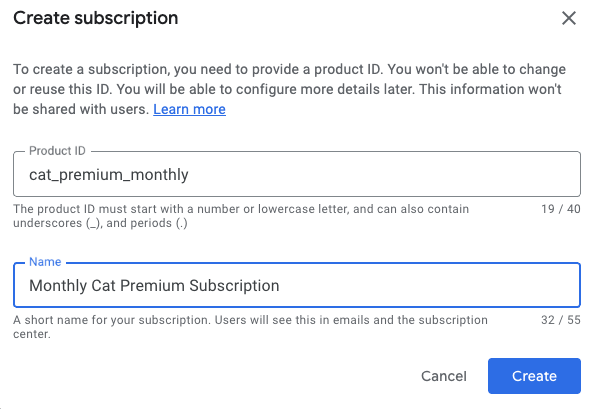
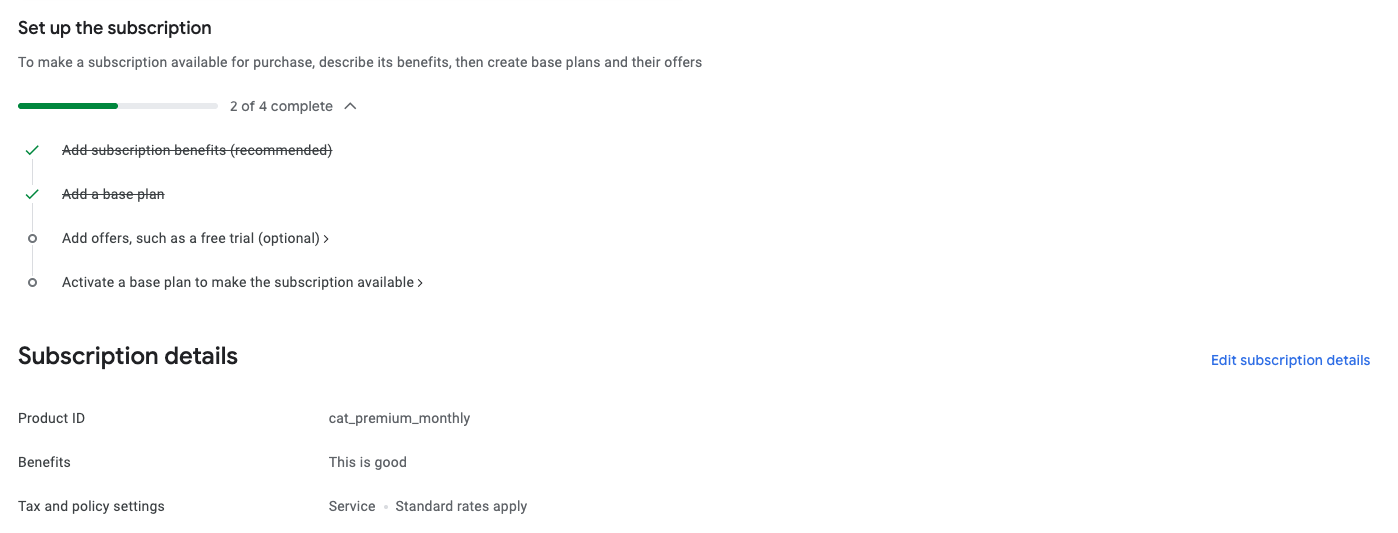
当您创建订阅产品时,可以通过添加订阅权益、配置基本方案、设置优惠(如免费试用或促销定价)以及最终激活产品来进一步自定义它。
完成 Google Play 上的产品设置后,您就可以开始了!如果您想深入了解创建应用内商品或订阅、制定可靠的产品 ID、设置基本方案和优惠,或添加非消耗品项目,请查看 Google Play 产品设置 指南了解详细说明和最佳实践。
将 Google Play 连接到 RevenueCat
0:15:00接下来,您应该设置您的 RevenueCat 账户 来管理产品、变现、统计数据等。您只需要一个电子邮件地址。
在 RevenueCat 上创建账户后,按照 Google Play Store 服务凭据指南中提供的说明配置一组 Google Play Store 服务凭据。
此设置使 RevenueCat 能够与您的 Google Play 产品集成,允许您将商店产品无缝导入 RevenueCat 仪表板、跟踪购买活动、分析 LTV 报告、获取用户购买通知,并使用实时数据洞察制定增长策略。
要开始使用,请按照以下步骤操作:
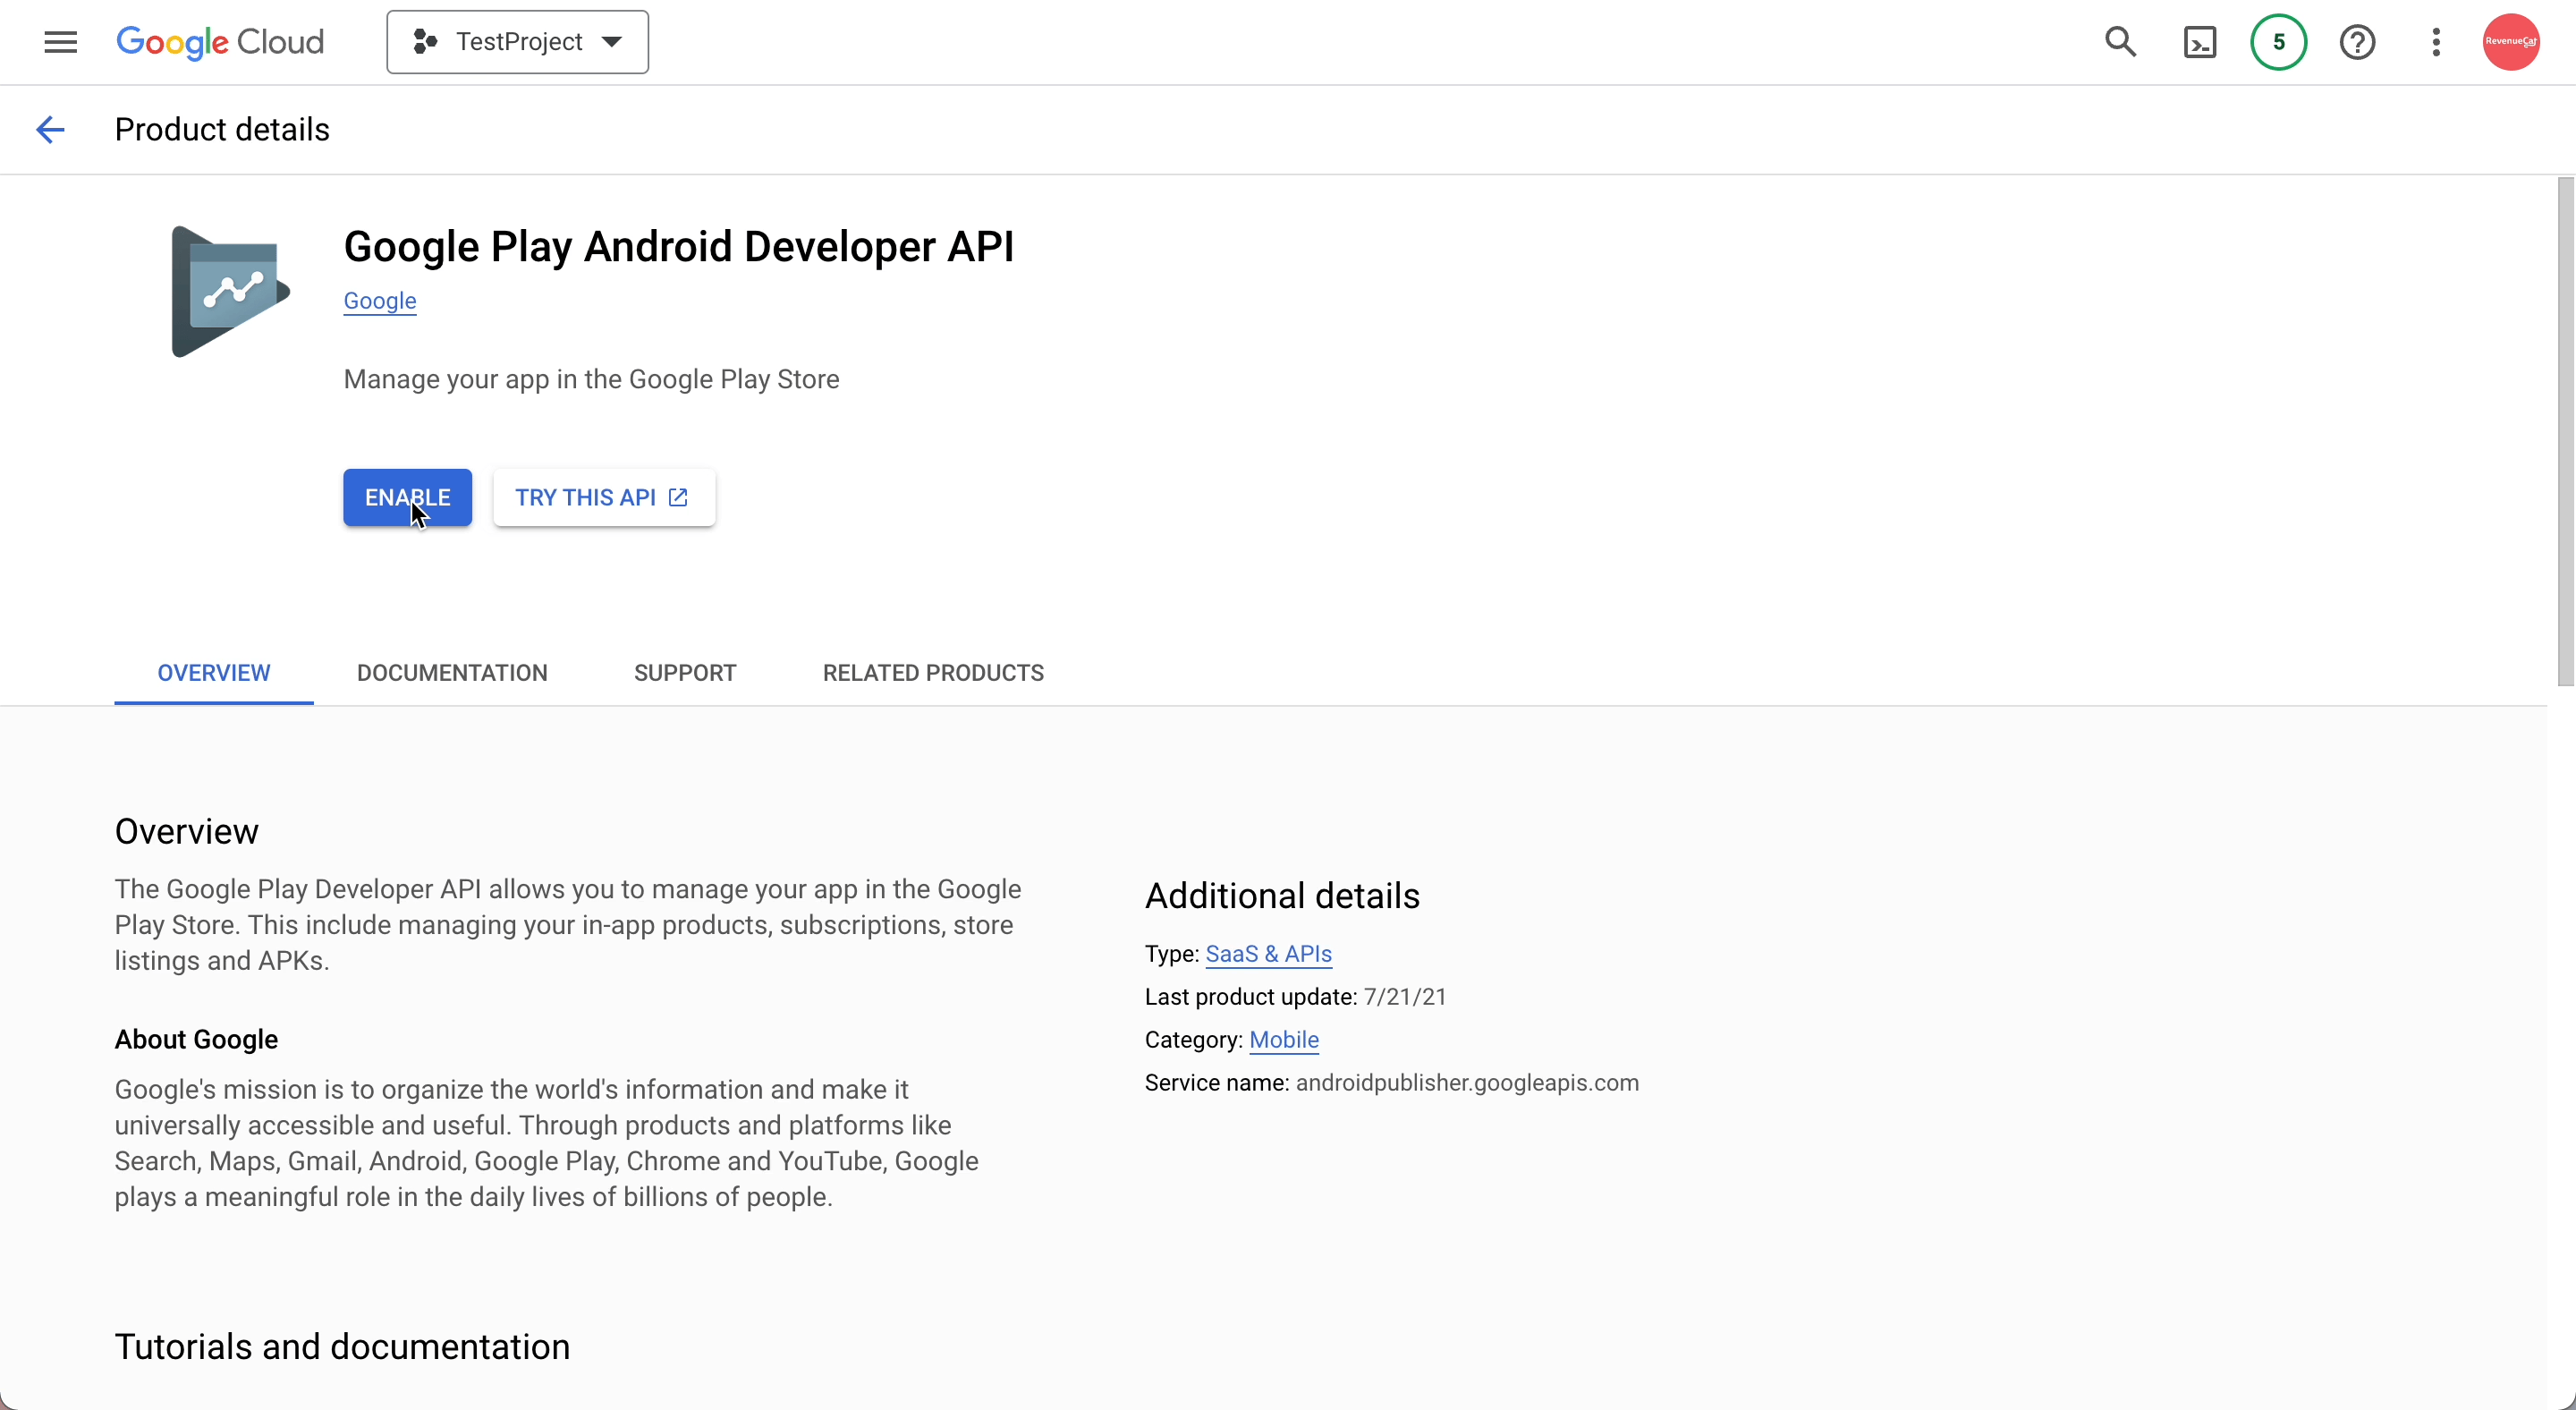
1. 启用 Google Developer 和 Reporting API
要在您的 Google Cloud 项目中激活 Google Play Developer API 和 Developer Reporting API,请按照以下步骤操作:
- 打开 Google Cloud Console。
- 从下拉菜单中选择现有项目或创建新项目。
- 访问 Google Play Android Developer API 和 Google Play Developer Reporting API 页面。
- 点击每个页面上的 启用 按钮(如果已激活则显示为 管理)。
API 启用后,您将进入项目的 API 仪表板。如果尚未配置凭据,系统将提示您创建凭据。请确保指定凭据用于 Google Play Android Developer API。此步骤应由项目所有者或从 Google Play Console 获得适当 API 访问权限的团队成员完成。
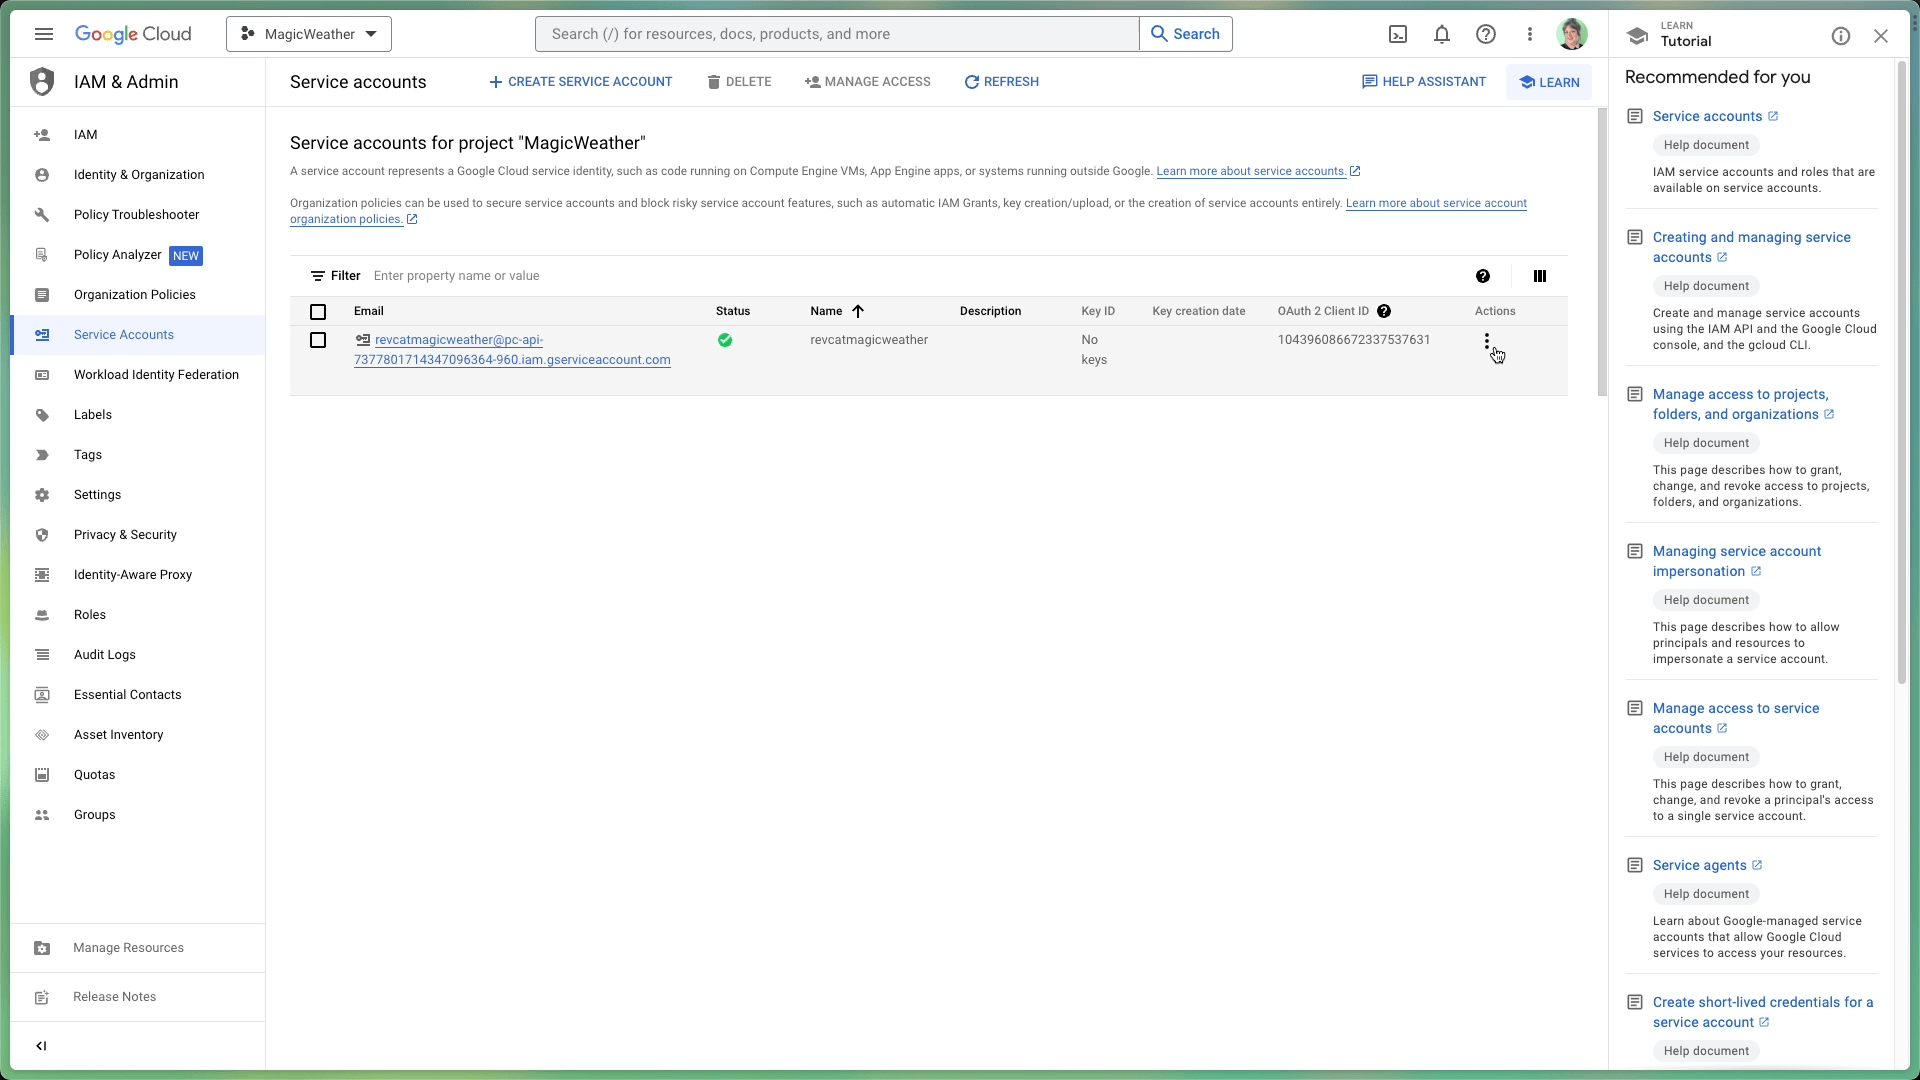
2. 创建服务账户
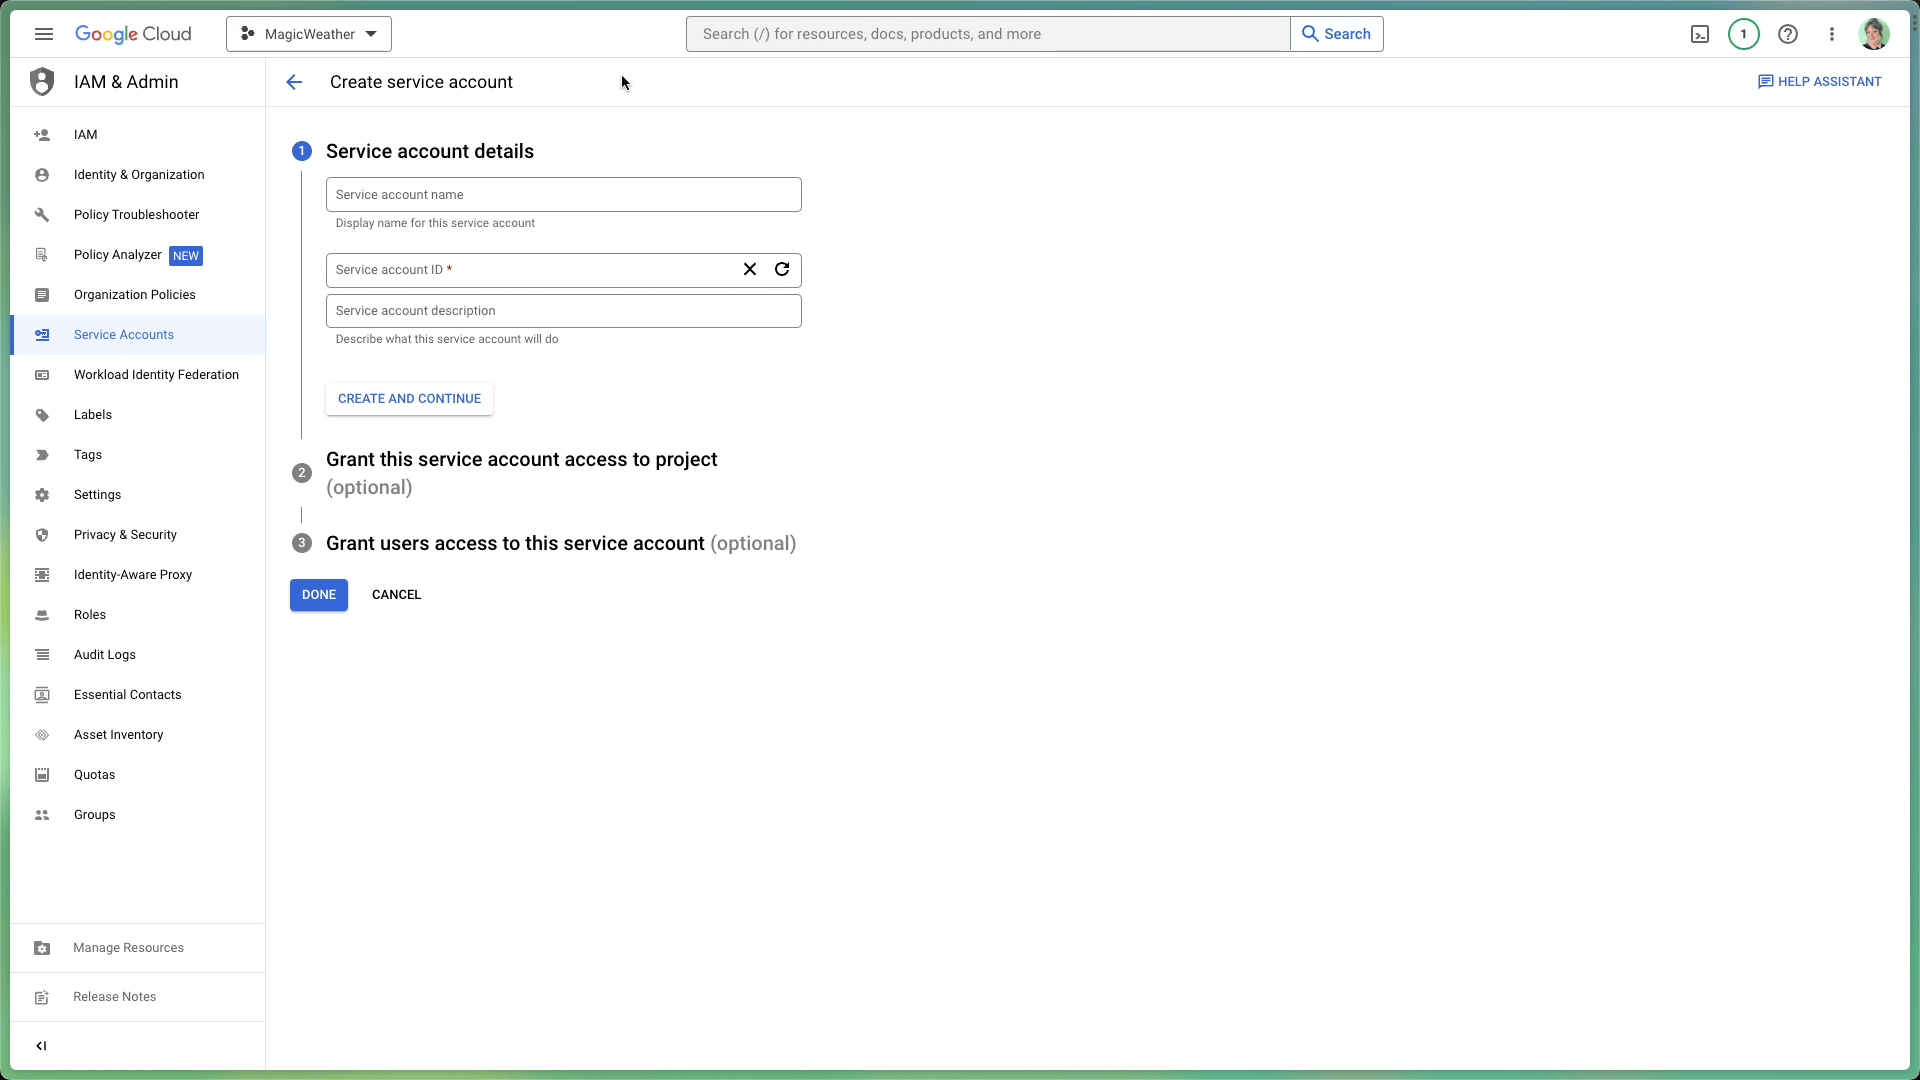
转到 Google Cloud Console 中的 服务账户 部分,并确保您在正确的项目中操作。
在这里,您需要生成一个服务账户,RevenueCat 可以使用它与 Google 服务进行交互。点击 创建服务账户,为其指定一个有意义的名称,然后选择 创建并继续。
当提示分配角色时,请确保包含以下内容:
Pub/Sub 管理员 – 处理 Google 实时服务器通知所需。 监控查看者 – 授予队列指标和性能的可见性。
> 注意:如果搜索栏没有返回这些角色,您可以在列表中的 Pub/Sub 和 监控 类别下手动找到它们。
现在是时候生成私钥文件了。
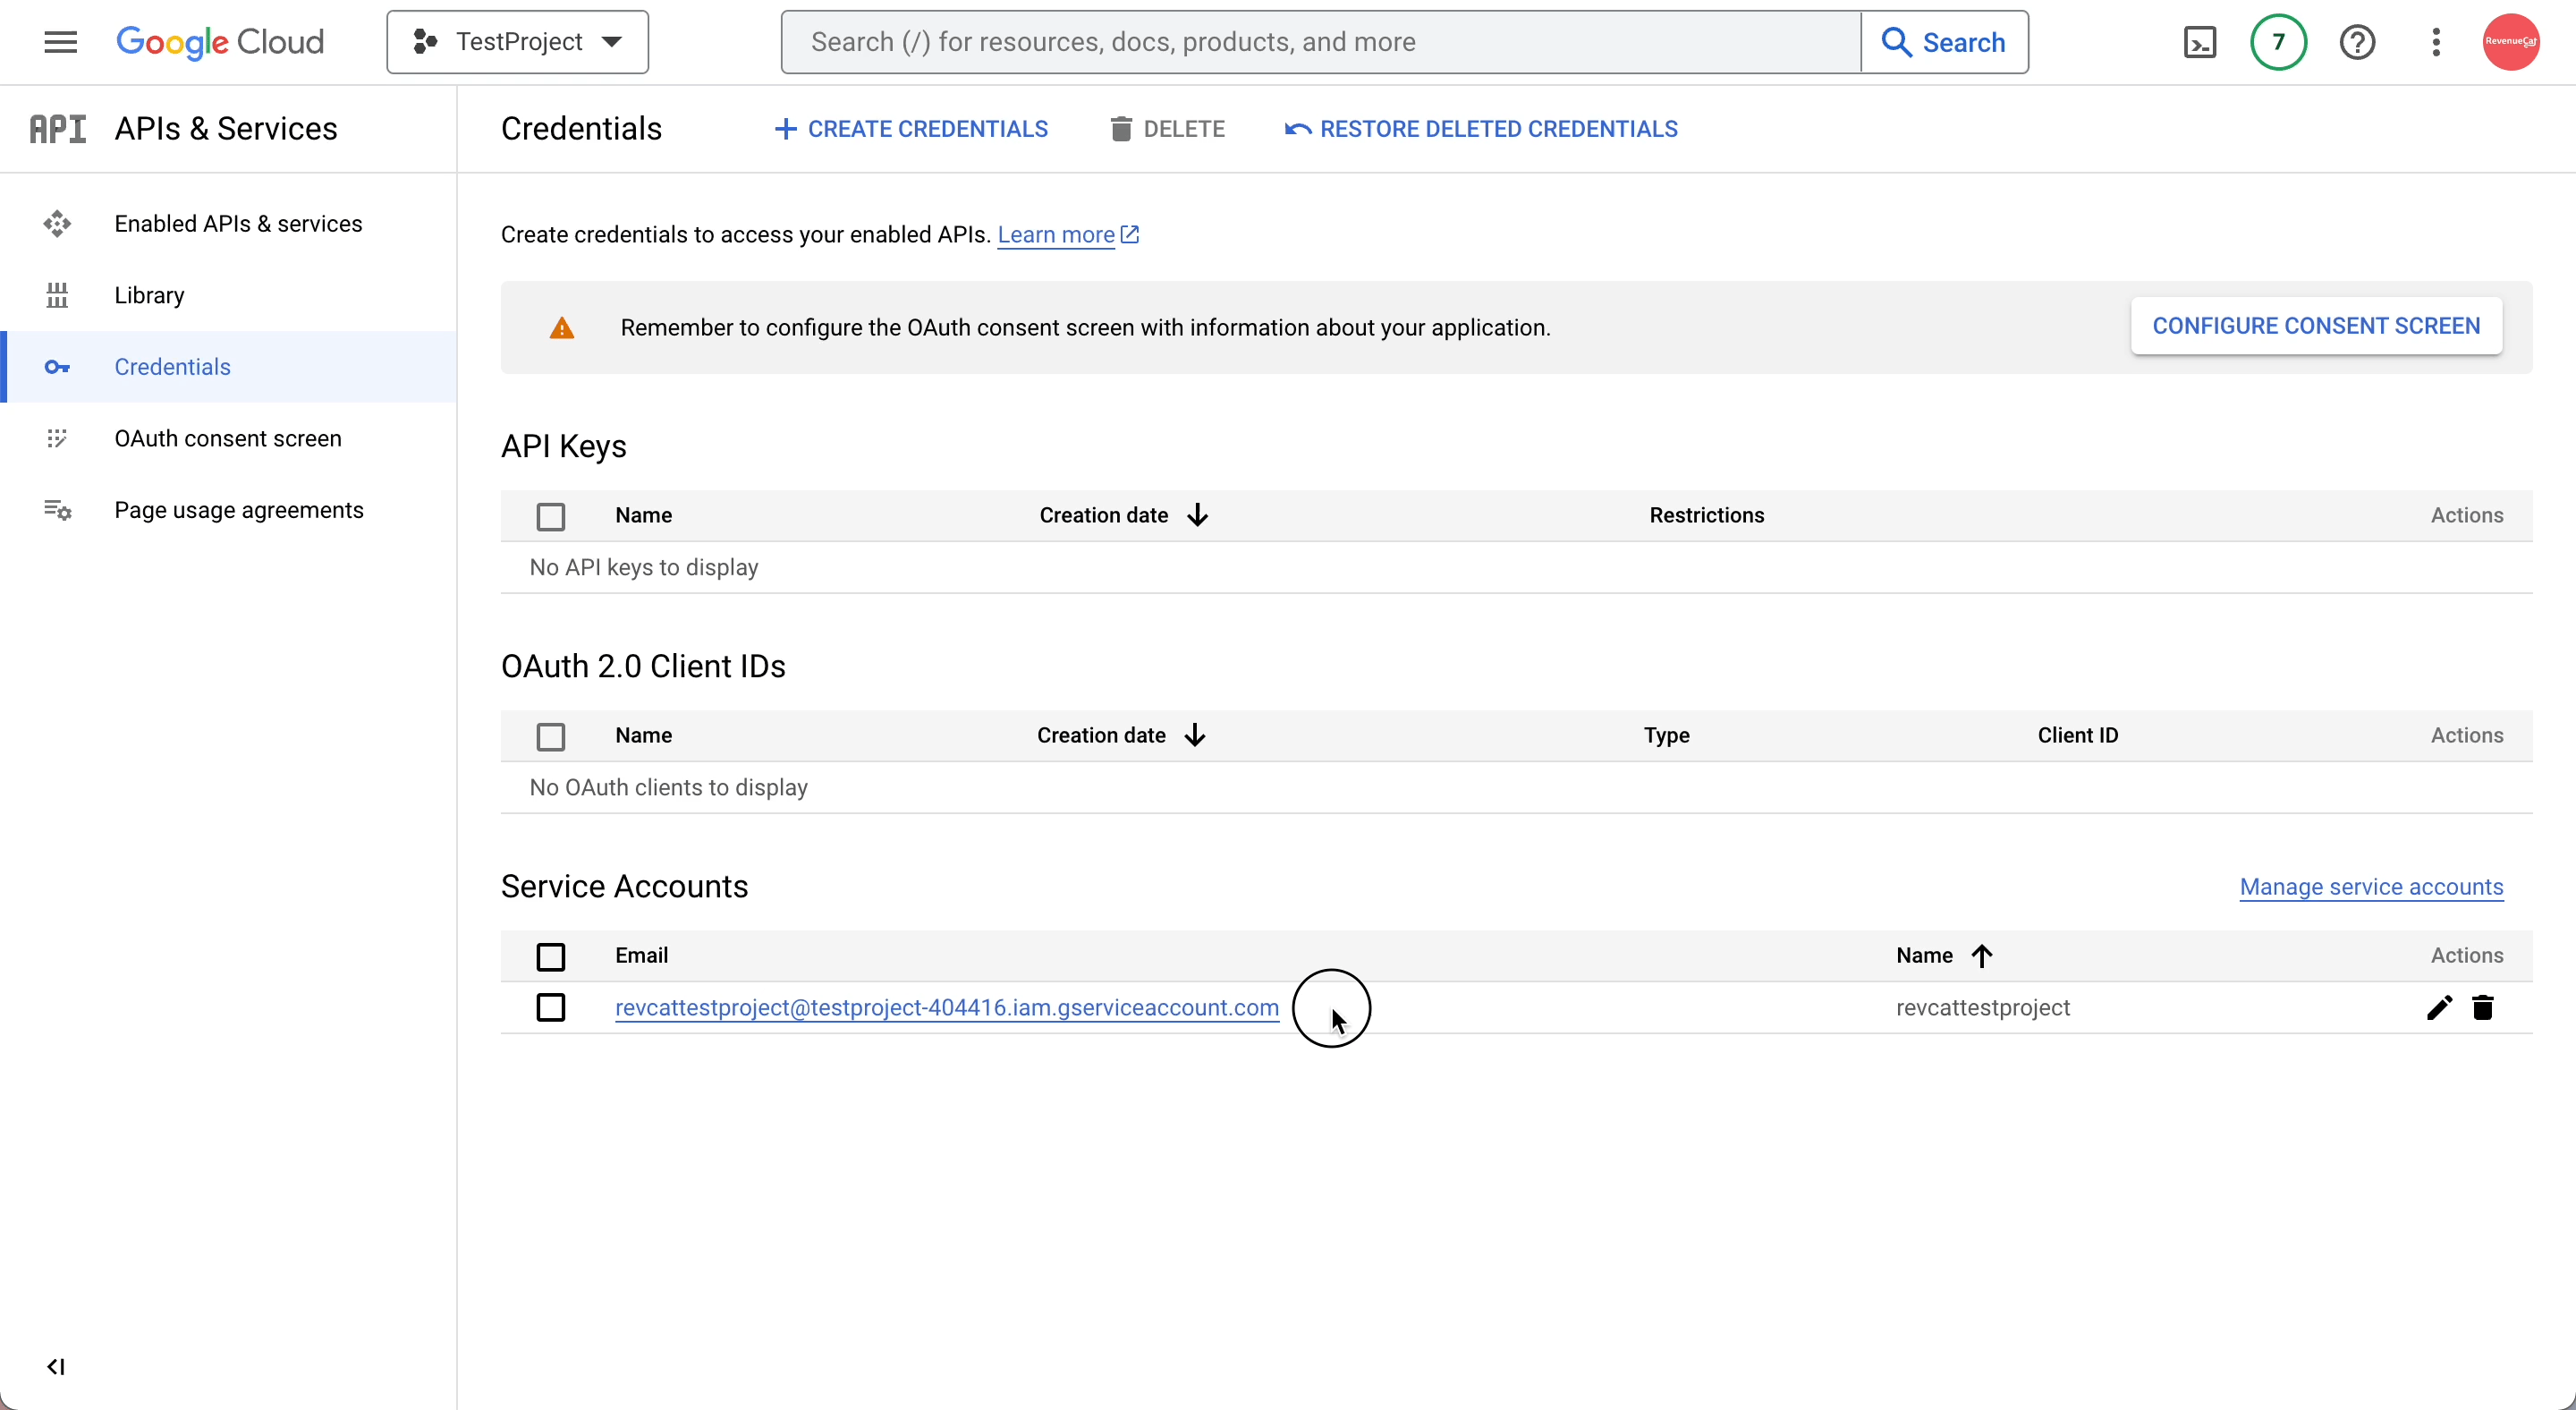
在 Google Cloud Console 的服务账户面板中,找到您刚创建的服务账户。点击"操作"列下的三点图标,选择 管理密钥。
然后,点击 添加密钥,选择 创建新密钥。当对话框出现时,确保在继续之前选择 JSON 格式。下载该文件——稍后的设置过程中将需要此 JSON 密钥。
3. 授予 RevenueCat 财务访问权限
转到 Google Play Console 中的 用户和权限 部分。到达后,点击 邀请用户 以添加您之前创建的服务账户电子邮件(步骤 2)。
接下来,在 应用权限 下,确保选择您希望 RevenueCat 访问的特定应用。然后向下滚动到 账户权限 区域——在这里您将授予所需的访问权限以使一切顺利运行。
确保勾选以下权限:
查看应用详情和访问批量报告下载 访问财务数据、订单历史记录和取消反馈- 管理订阅和客户订单
一切看起来正常后,滚动到底部并点击 发送邀请。发送后,您将返回到用户和权限概述,一旦接受邀请,您应该会看到您的服务账户以活动状态列出。
4. 在 RevenueCat 中注册凭据 JSON
最后,转到您的 RevenueCat 仪表板 并打开项目设置。找到您之前保存的 JSON 凭据文件(来自步骤 2),然后将其拖放到设置区域或使用文件选择器手动浏览。
上传后,不要忘记点击 保存 以应用更改。RevenueCat 将开始验证您的凭据,大约 36 小时内,您就可以通过集成开始处理 Google Play 购买了。
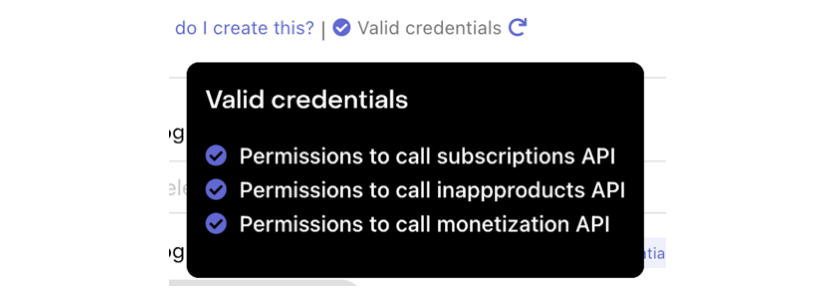
您可以通过点击 "验证凭据" 按钮来验证您的凭据,如下所示:

将显示一个摘要,显示验证结果并让您了解 Google 凭据的当前状态。如果一切设置正确,您将在上传的 JSON 文件下方看到 "有效凭据" 消息,以及所有必需权限的清单。
5. 上传已签名的 APK 或 Android App Bundle
完成前面的步骤后,还有一些最终检查以确保一切正确连接:
- 确认您已签名的 APK 或 App Bundle 已成功上传到 Google Play Console。
- 确保您的版本已通过所有必需的审核和批准步骤。
- 验证您的应用在 封闭式 或 开放式 测试轨道中可用,并且您已添加至少一个测试人员账户。
- 仔细检查您的订阅产品在 Play Console 中是否标记为 活动。
- 最后,确保您在 RevenueCat 中使用的 包名 与 Google Play 中注册的完全匹配——逐字符匹配。
这些最终验证对于避免设置问题并确保 RevenueCat 能够与您的 Google Play 数据无缝同步至关重要。
恭喜!您已经完成了棘手的部分 🎉
产品、Offering、Package 和权益
0:06:00此时,大部分复杂的设置已经完成。现在是时候熟悉 RevenueCat 中四个基本概念了,在配置变现策略之前您需要理解这些概念:产品(Product)、Offering、Package 和 权益(Entitlement)。
这四个概念在您如何定义、展示和管理跨平台应用内购买方面各自发挥着独特的作用。
🧩 产品(Product)
产品是在商店平台(如 Google Play、Apple App Store 或 Web)上直接创建和管理的单个应用内购买项目。这是变现的基本单位——可以是月度订阅、终身访问或一次性购买。每个产品都有其独特的标识符、价格和由商店定义的时长设置。
> 示例:在 Google Play 中配置的月度订阅产品,如 com.app.pro_monthly。
🎯 Offering
Offering 是一组产品的集合,作为付费墙体验在您的应用中呈现给用户。Offering 在 RevenueCat 仪表板中配置,为您提供管理 A/B 测试、价格实验和区域或用户细分付费墙的灵活性,所有这些都无需应用更新。
> 示例:名为 default 的 Offering 可能包含向用户展示的月度、年度和终身选项等多个 Package。
📦 Package
Package 作为跨不同平台(如 iOS、Android、Web)等效产品的包装器。它允许您在各平台上一致地展示一个定价选项(如月度订阅),同时将其链接到每个商店的特定产品 ID。
每个 Package 在 Offering 中都有唯一的标识符(如 monthly、annual),帮助 RevenueCat 根据用户的平台解析正确的产品。
> 示例:一个 monthly Package 可能在 iOS 上映射到 com.app.pro_monthly_ios,在 Android 上映射到 com.app.pro_monthly_android。
🏷️ 权益(Entitlement)
权益定义了用户成功购买后获得的访问权限。它代表解锁的功能或内容,并抽象化了底层的产品或 Package 标识符。权益允许您管理用户访问逻辑(如"拥有高级访问权限"),而无需在应用中硬编码产品 ID。
权益也是 RevenueCat 跨设备和平台跟踪和恢复购买的核心。
> 示例:名为 premium 的权益可能授予购买与该访问级别相关的任何产品(如月度或年度订阅)的用户。
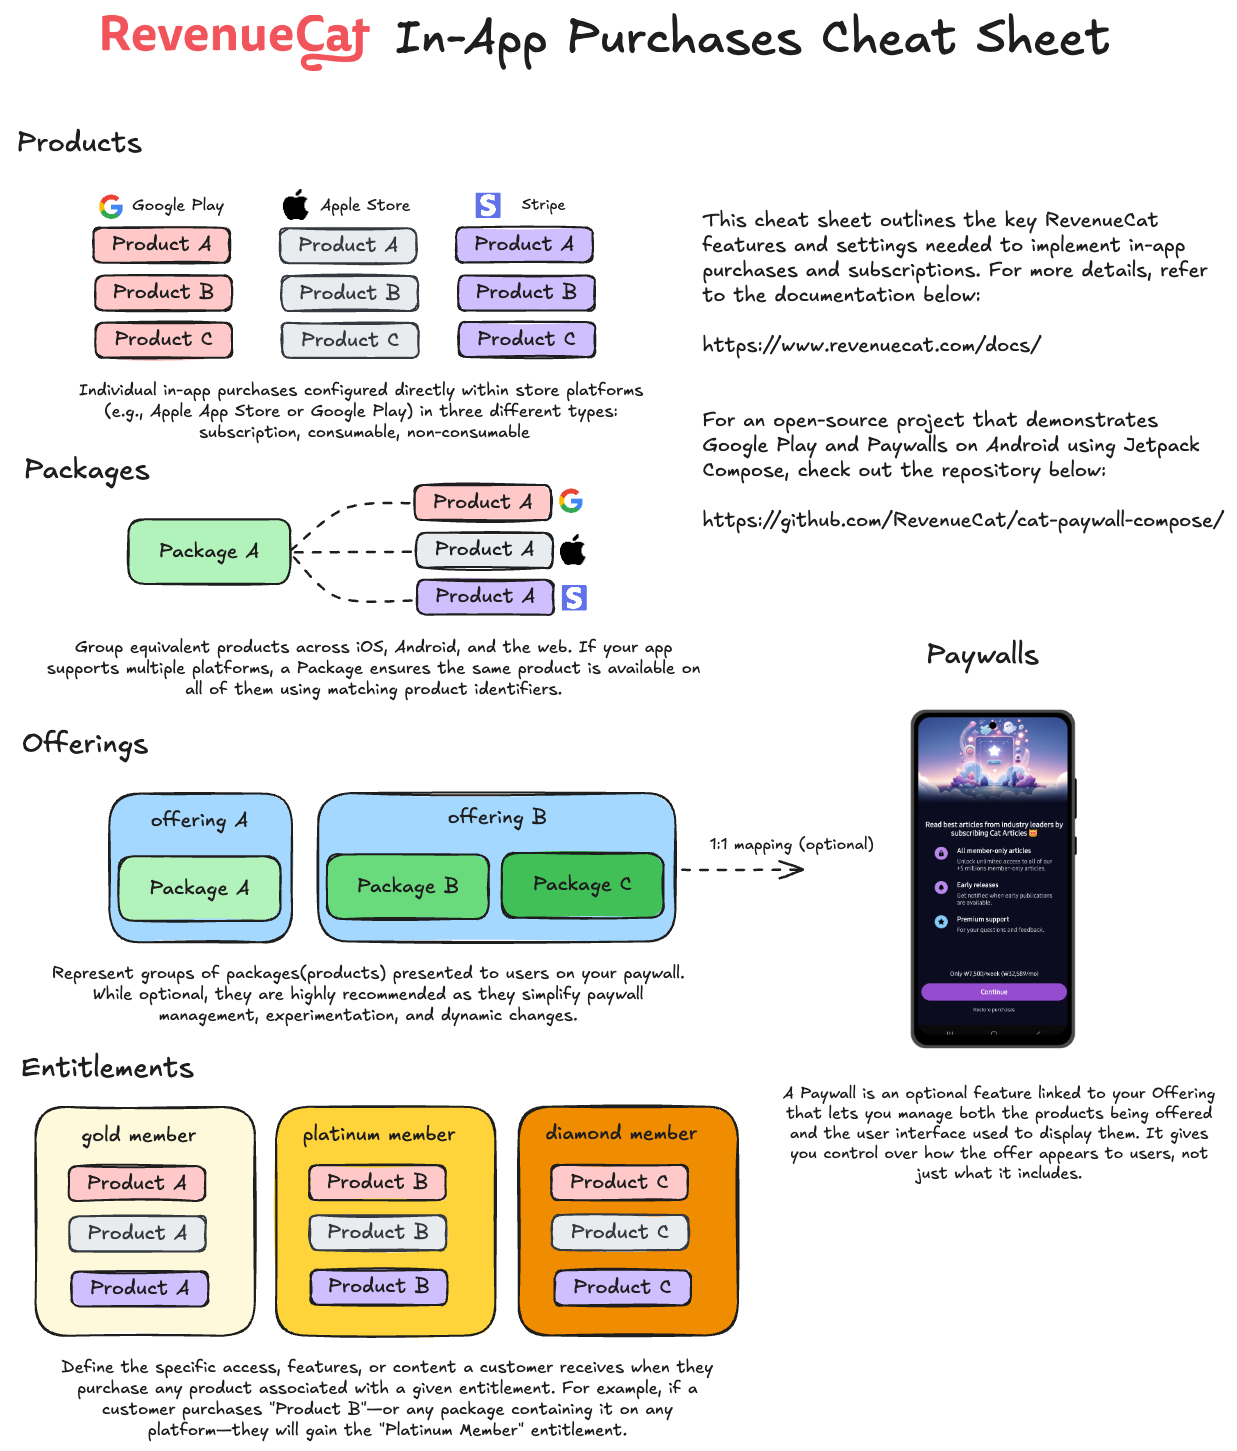
速查表
了解这四个元素如何协同工作将使管理跨平台订阅、尝试定价策略和提供无缝的应用内购买体验变得更容易。
为了更容易理解,您可以参考下面 RevenueCat 应用内购买速查表中的可视化图表:
导入商店产品
0:03:00Why Import Products?
In the previous step, you created products directly in Google Play Console. However, RevenueCat needs to know about those products so it can manage purchases, validate receipts, and track subscriptions on your behalf. Importing products into RevenueCat bridges the gap between your store configuration and RevenueCat's platform.
Once imported, RevenueCat can:
- Validate purchases: Verify that transactions are legitimate by communicating with Google Play.
- Track subscription status: Monitor renewals, expirations, and cancellations automatically.
- Provide unified analytics: Give you a single dashboard view of revenue, subscribers, and product performance.
- Power Entitlements and Offerings: Link products to entitlements and group them into offerings for your paywalls.
How to Import
Go to the RevenueCat dashboard, navigate to your project, and open the Products tab under Product Catalog.
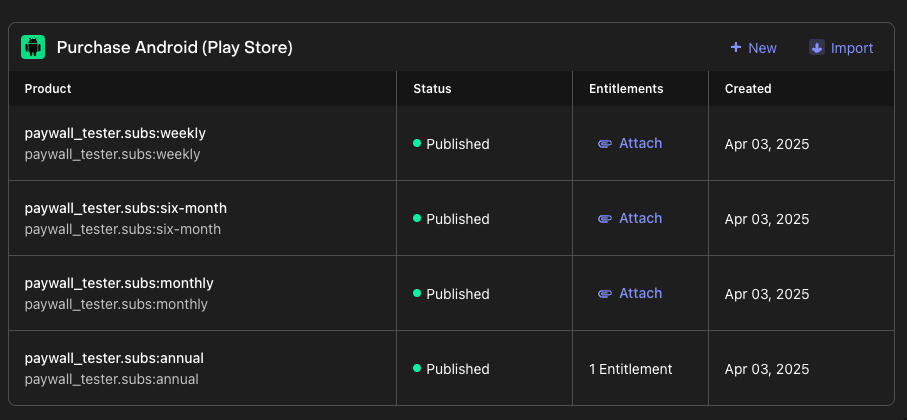
Click the + New button in the top right corner, then select Import Products from the dropdown menu. RevenueCat will automatically fetch and display a list of available in-app products from your connected Google Play store account.
Once your products have been imported, you'll see that the in-app purchase items have been successfully added to your RevenueCat project. These imported products are now ready to be attached to Entitlements and grouped into Offerings in the next steps.
创建权益
0:05:00现在您已经导入或创建了产品,是时候设置 权益 了。如您所知,权益定义了用户成功购买后获得的访问权限。"购买"可以指任何类型的应用内交易——例如一次性购买或订阅——用户通过这些交易来访问您的服务。
通常,您需要根据您的 功能访问层级(如 "has_premium_access")创建一个或多个权益。这些权益让您可以控制应用内受限功能或内容的访问。
要创建新权益:
- 在项目仪表板的左侧菜单中转到 产品目录。
- 点击 权益 选项卡。
- 选择 ➕ 新建权益。
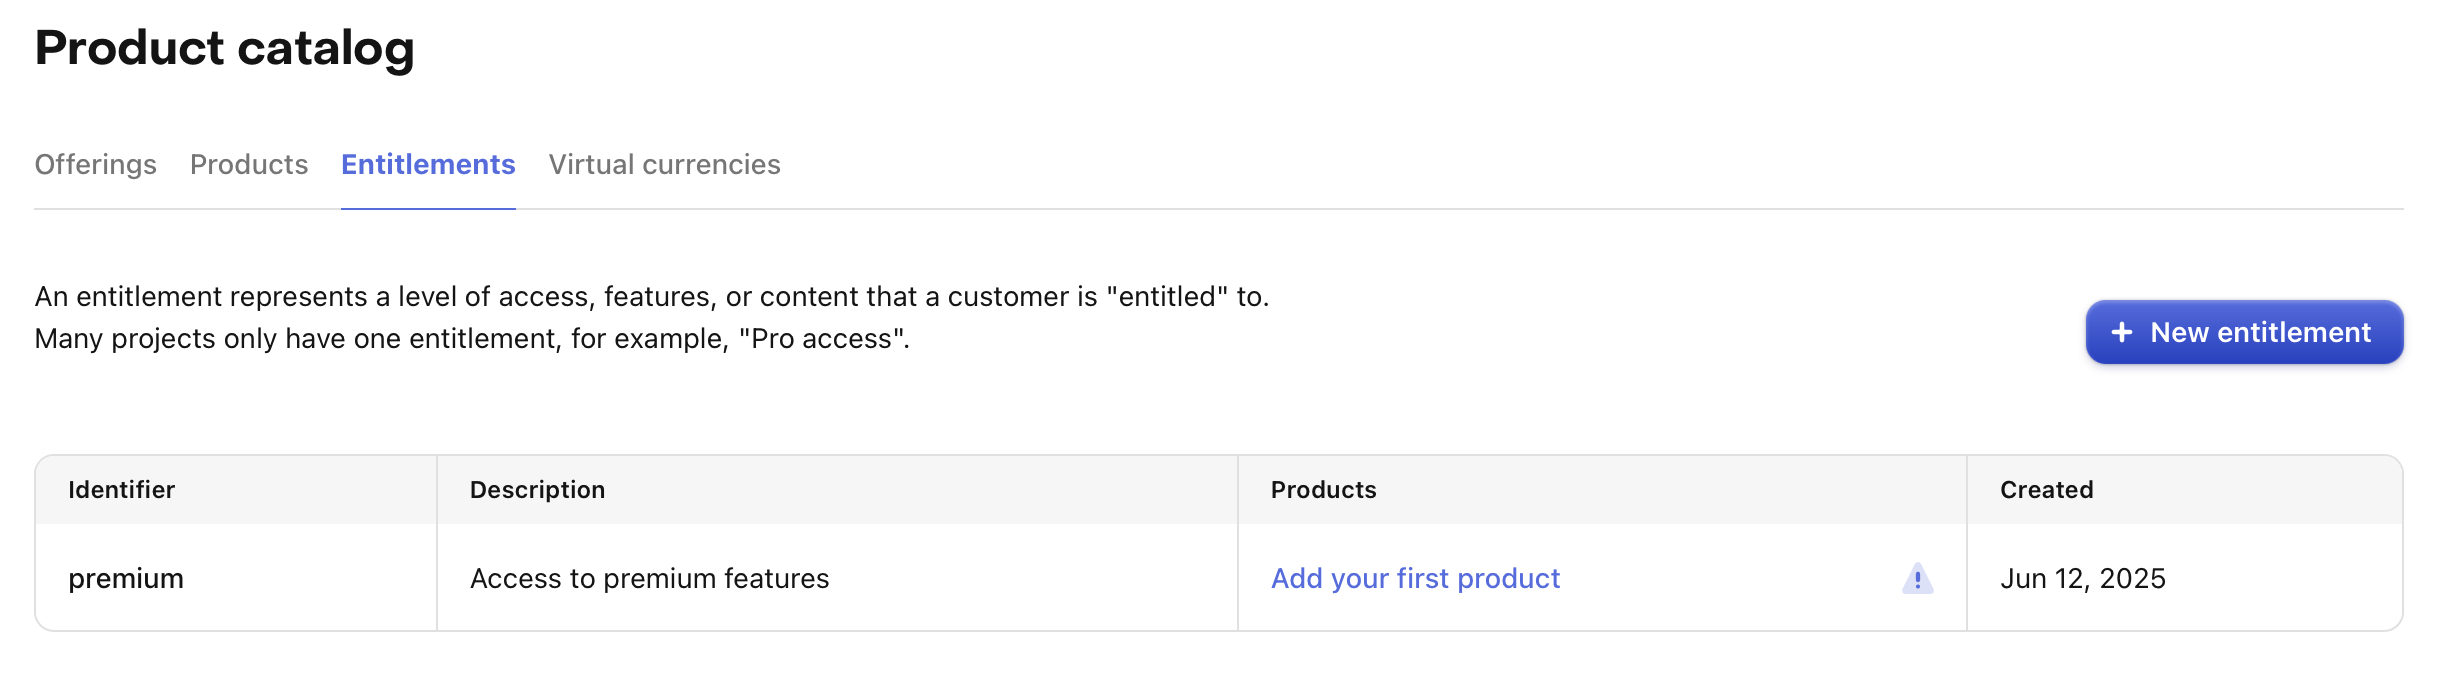
系统将提示您输入权益的 唯一标识符(如 "pro"),您稍后将在应用中引用它来检查用户的访问级别。
大多数应用使用单个权益,但如果需要可以创建多个。例如,一个 导航应用 可能提供完全访问权限的订阅("pro"),同时还出售一次性购买来解锁特定地图区域。在这种情况下,您可能有一个 "pro" 权益,以及每个区域的额外权益(如 "map_north_america"、"map_europe")。
将产品附加到权益
现在是时候 将产品附加到权益 了,这将您的应用内购买与它们解锁的访问权限关联起来。此设置确保当用户购买产品时,他们会获得相应的权益——使他们能够访问应用中的特定功能或内容。
例如,您可以使用简单的 if 语句轻松实现受限功能,检查用户是否拥有给定的权益。
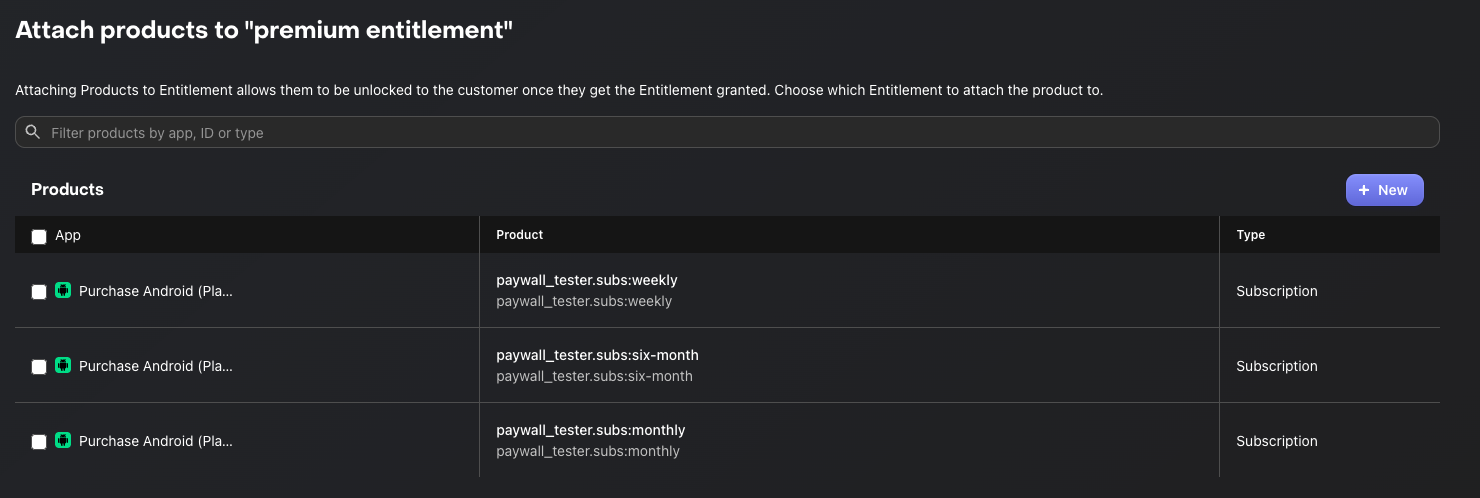
要将产品附加到权益:
- 在 RevenueCat 仪表板中打开 权益 选项卡。
- 点击要配置的权益。
- 点击 附加 按钮。
- 如果您已经添加了产品,您将在列表中看到它们——只需选择要关联的产品。
当购买附加到权益的产品时,权益在该产品的有效期内处于活动状态。
对于 订阅产品,权益在订阅期间保持活动状态。 对于 非消耗品 或 消耗品 购买(当附加到权益时),权益通常会 永久 解锁内容。
这种机制允许您根据购买类型管理功能访问,而无需在应用中处理复杂的逻辑。
如果您不打算在应用中实现 付费墙,可以跳到 总结 部分。否则,请继续下一步学习如何创建 Offering。
创建 Offering
0:07:00If you want to introduce Paywalls in your app, the first step is to create Offerings. An Offering represents a set of products that are presented to users on your paywall.
Creating an Offering
To create a new Offering, navigate to Product Catalog → Offerings in your RevenueCat dashboard, then click the + New button.
You'll be prompted to fill in the following fields:
- Identifier: A unique key used to reference this offering in your code (e.g.,
default). This cannot be changed later, so choose a meaningful name. - Display Name: A human-readable name for this offering that helps you identify it in the dashboard (e.g., "Default Offering").

Once you've filled in the details, click Create to save the new Offering. Your newly created Offering will now appear in the Offerings list.
Note that RevenueCat automatically creates a "Default" Offering for your project. You can use this default offering or create additional ones to support different paywall configurations, A/B tests, or regional pricing strategies.
Adding Packages
A Package serves as a wrapper for equivalent products across different platforms (e.g., iOS, Android, Web). This provides a single source of truth for your products across platforms.
For example, if a user purchases a product on Android, they can still access the same entitlement on their iOS device, as long as they're logged into the same account.
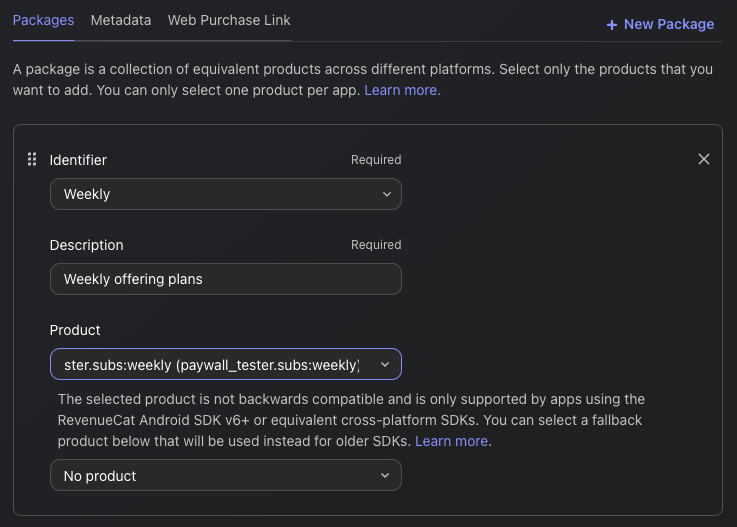
To create a package, navigate to your newly created Offering, then click the Edit button to configure the details, and then you can add packages by clicking the + New Package in the Packages section.
From there:
- Choose an Identifier from the dropdown that best represents the package duration (e.g., monthly, annual).
- If none of the predefined durations fit—such as in the case of consumable purchases—you can select a custom identifier instead.
- Add a description to help clarify the purpose or contents of the package.
- Attach the relevant products that match the chosen duration (e.g., monthly products across iOS and Android).
- Click Save to create the package.
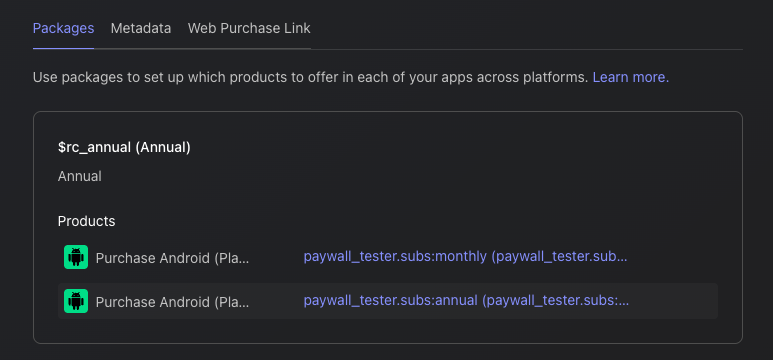
Once you've added all the Packages to your Offering, you'll see the results displayed as shown below:
The relationships between Offerings and Packages
So, an Offering can contain multiple Packages, allowing you to "offer" different options to users. This means you can present various choices—such as monthly, annual, or lifetime plans—all within a single Offering, as illustrated in the diagram below:
Offering(如 "pro 方案")
                    |
       --------------------------------
       |              |              |
   Package A      Package B      Package C
   ("月度")       ("年度")       ("终身")
       |              |              |
 产品 A1         产品 B1         产品 C1
 (iOS/Android)   (iOS/Android)   (iOS/Android)
Alright, time to create some awesome Paywalls!
创建付费墙
0:07:00A paywall is a screen that encourages users to purchase your products. RevenueCat's paywall system is built on a server-driven UI, allowing you to update layouts instantly using the Paywall Editor without needing to release a new app version.

This allows your team to focus on A/B testing, refining offerings, and optimizing messaging to boost subscriptions, all without the delays of app updates. If you want to deep dive into the server-driven UI approach, you can read Server-driven UI SDK on Android: how RevenueCat enables remote paywalls without app updates.
Prerequisites: Offering Setup
Before creating a paywall, you must have at least one Offering configured with packages. The paywall will be linked to an Offering, and the packages within that Offering determine which products are displayed to users.
How Paywalls Connect to Offerings
Understanding the relationship between Paywalls and Offerings is crucial:
- Offering = The container that holds your packages (products)
- Paywall = The visual presentation layer that displays those packages
- One Offering can have one active Paywall at a time
- When you select an Offering for your paywall, it automatically has access to all packages within that Offering
Creating a New Paywall
To start building, go to the Paywalls page for your project and click + New Paywall.

Choose a Starting Point
You have three options to begin:
- Pre-built Templates (Recommended): Start with professionally designed templates and customize them.
- Start from Scratch: Build your paywall from a blank canvas.
- Import from Figma: Import designs directly from Figma.
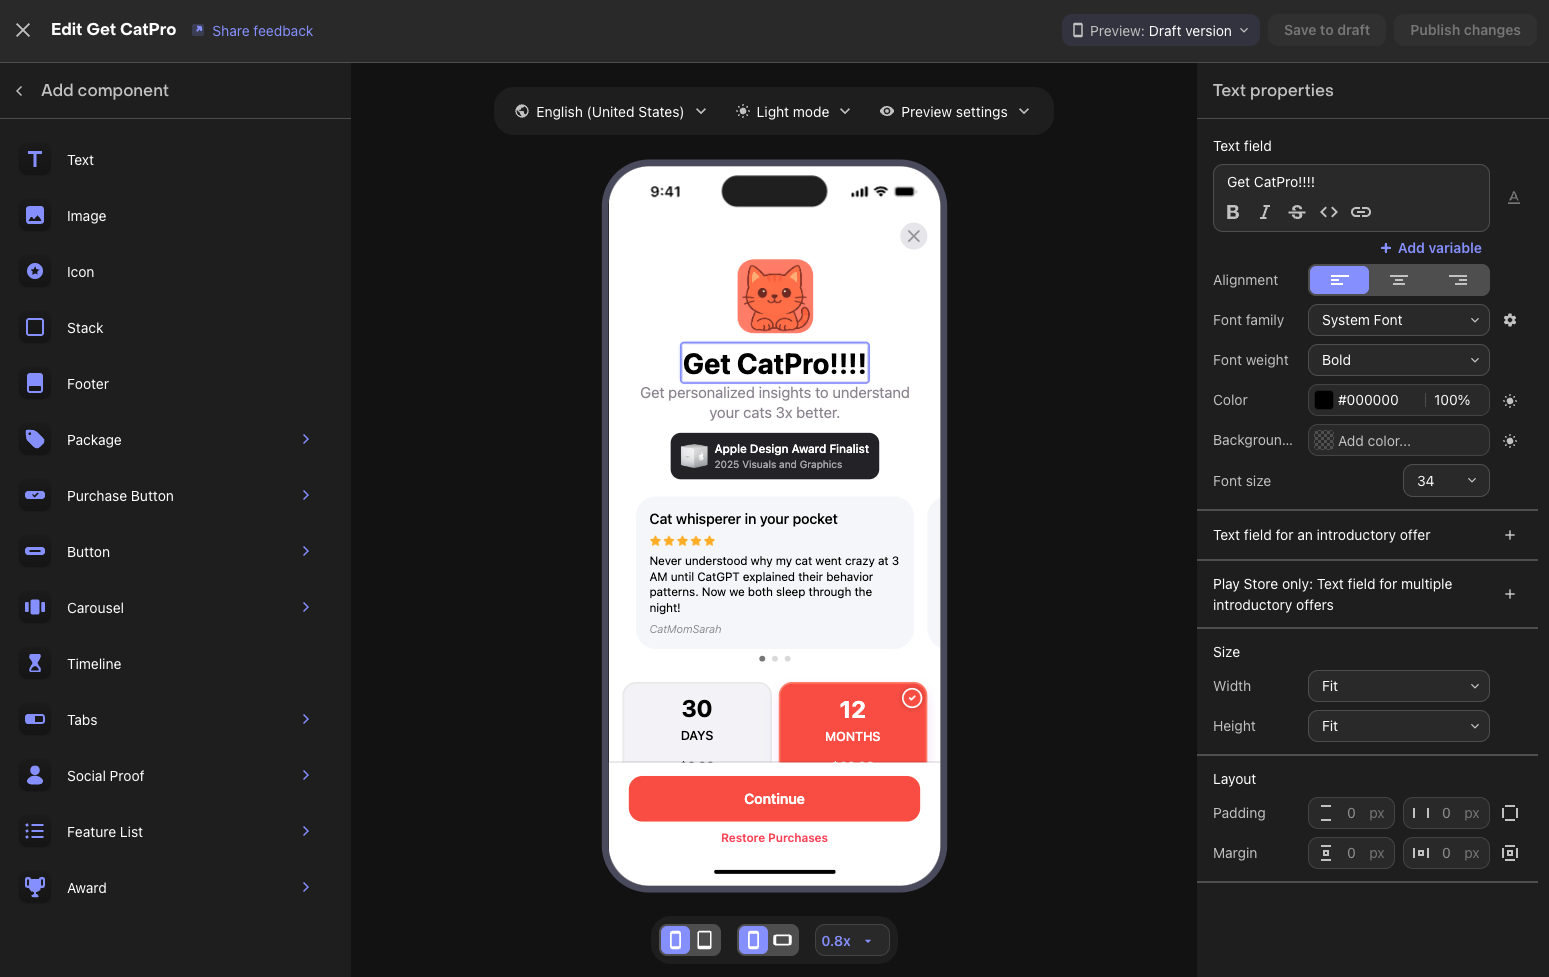
Using the Paywall Editor
The Paywall Editor consists of three main areas:
- Left Sidebar: Add components, view the layer hierarchy, manage branding and media assets.
- Center Preview: Real-time visualization of your paywall.
- Right Panel: Configure properties for the selected component (sizing, styling, behavior).
Key Configuration Steps
- Set the Paywall Name: Give your paywall a descriptive name (e.g., "Main Subscription Paywall").
- Select an Offering: Choose which Offering this paywall will display. The identifier links the paywall to your Offering.
- Configure Components: Add and arrange text, images, icons, package selectors, and purchase buttons.
- Style Your Design: Customize colors, fonts, spacing, and images to match your app's branding.
- Set Up Purchase Button: Ensure the purchase button is connected to trigger checkout for the selected package.
Available Components
RevenueCat provides various building blocks for your paywall:
- Text & Images: Headlines, descriptions, feature lists, and visual assets.
- Package Selector: Displays your subscription options from the linked Offering.
- Purchase Button: Triggers the purchase flow for the selected package.
- Footer: Terms of service, privacy policy, and restore purchases links.
- Stacks & Containers: Layout components to organize other elements.
- Carousels: Swipeable content sections.
Preview Options
Use the editor's preview controls to test your paywall:
- Toggle between Light and Dark mode
- Switch between different device sizes
- Preview different locales if you have localized content
Draft vs Published
Paywalls have two states:
| State | Description | Visible to Users |
|---|---|---|
| Draft | Work in progress, saved but not active | No |
| Published | Live and served to users via SDK | Yes |
Workflow:
- Make changes and click "Save to draft" to save your work without affecting live users
- When ready, click "Publish changes" to make your paywall live
- You can toggle a published paywall back to inactive status anytime
You've completed all the configuration steps for setting up Google Play products and the RevenueCat dashboard! Next, let's look at how to test your in-app purchases.
Testing in-app purchases (Optional)
0:05:00Before shipping your app to production, you'll want to test the complete purchase flow. There are two approaches to testing in-app purchases: RevenueCat Test Store for fast, deterministic testing without any special account setup, and Google Play License Testing for end-to-end testing with Google's infrastructure.
RevenueCat Test Store
Test Store is RevenueCat's built-in testing environment that allows you to test in-app purchase flows without connecting to Google Play. It's automatically provisioned with every RevenueCat project and gives you complete control over purchase outcomes.
Key benefits of using Test Store:
- Deterministic outcomes: Control whether purchases succeed, fail, or get cancelled — no more flaky sandbox behavior.
- No special accounts needed: Skip the hassle of creating and managing license tester accounts.
- Fast feedback: Test purchase flows in seconds rather than minutes.
- Works in CI/CD: Write automated tests for your purchase logic that run reliably in any environment.
To get started with Test Store, navigate to your RevenueCat dashboard, go to Apps & providers, and enable Test Store. You'll receive a Test Store API key prefixed with test_ that you can use in place of your production API key during development and testing.
Google Play License Testing
Google provides license testing that allows you to simulate purchases using Google Play's infrastructure without being charged real money.
To set up license testing:
- Go to the Google Play Console.
- Navigate to Settings → License testing.
- Add the Google account email addresses of your testers.
- Set the license response to RESPOND_NORMALLY for standard testing.
When testing on a real device with a Google account added as a license tester, purchases will show as "Test order" and no real charges will be made. This gives you end-to-end testing with Google's actual billing infrastructure.
With your testing approach configured, you're ready to ship with confidence! Let's wrap up in the conclusion.
总结
在本 Codelab 中,您学习了如何配置 Google Play 产品、将 Google Play 账户连接到 RevenueCat 仪表板,以及设置产品、Offering、权益和付费墙。现在一切都已配置完成,您可以将 RevenueCat SDK 集成到您的项目中了!
接下来:
- 集成 RevenueCat Android SDK 实现应用内购买和付费墙 — 您迈向完全功能化变现流程的下一步。
- 集成 RevenueCat Kotlin Multiplatform SDK 实现应用内购买和付费墙 — 您的 KMP/CMP 项目迈向完全功能化变现流程的下一步。
- 集成 RevenueCat Flutter SDK 实现应用内购买和付费墙 — 您的 Flutter 项目迈向完全功能化变现流程的下一步。
- 产品教程:帮助您入门并充分利用 RevenueCat 的视频教程。