How the Pieces Fit
0:04:00Developers keep telling us the same thing: connecting Google Play to RevenueCat is easy, and the Google Cloud part is what takes an afternoon. The setup spans three consoles and two separate permission systems, it includes a propagation delay of up to 36 hours, and newer Google Cloud organizations ship with security policies that block two of the exact steps you need.
This codelab collects the failures developers actually report, from RevenueCat Community threads and from the RevenueCat and Google documentation, and puts each one at the step where it happens, with the fix right next to it. Follow the steps in order to avoid them. If you already have an error, jump to the Error Lookup Table.
What you will set up
- A service account with a JSON key. RevenueCat signs in as this account to validate Google Play purchases and read your products.
- The Play Console permissions that let that service account see your app's purchase data.
- A Cloud Pub/Sub topic that Google Play publishes real-time developer notifications (RTDN) to, so RevenueCat hears about renewals, cancellations, and refunds as they happen.
The mental model that prevents most mistakes
Two different Google identities are involved, and each one gets its permission in a different place:
| Identity | What it does | Where it gets permission |
|---|---|---|
Your service accountrevenuecat-service-account@PROJECT_ID.iam.gserviceaccount.com | RevenueCat signs in as this account with your JSON key. It calls the Google Play Developer API and creates the Pub/Sub topic. | Google Play data: Play Console > Users and permissions. Pub/Sub: Cloud IAM roles in your project. |
Google Play's notification accountgoogle-play-developer-notifications@system.gserviceaccount.com | Owned by Google. It publishes the notifications to your topic. | Pub/Sub Publisher on that one topic, in Cloud. |
How long it takes
About 50 minutes of hands-on work, split around a wait. Google can take up to 36 hours to activate new credentials, so plan to do Steps 2 to 8 today and Steps 9 and 10 once the credentials validate.
Preflight Checks
0:05:00Five minutes of checks here prevent the failures that cost the most time later, because each of them otherwise surfaces deep into the setup, often after someone has already waited a day.
1. Which Cloud project will hold everything?
Any Google Cloud project works. Google removed the old requirement to link a Cloud project to your Play developer account: "You no longer need to link your developer account to a Google Cloud Project in order to access the Google Play Developer API." That is also why current Play Consoles no longer have the Setup > API access page. An existing project, including one that Firebase created for your app, is fine, and so is a new one.
The one rule: keep everything in this single project. The three APIs, the service account, and the Pub/Sub topic must all live in it. Most "API not enabled" and "permission denied" errors that survive a careful setup come from enabling an API in one project and creating the service account in another.
- No project yet? In the Google Cloud Console, open the project picker at the top, click New project, enter a name, and click Create.
- Write down the Project ID (for example
my-app-4f2a1), not the display name. The project picker lists it next to each project, and the project dashboard shows it on the Project info card. - Signed in to several Google accounts? Check the account avatar in the Cloud Console and in Play Console before every step. Console links open in whichever account is active, and a project or app "missing" from a list is often just the wrong account.
2. Is the project inside an organization?
Open the project picker. If your project sits under an organization name (typical when you sign in with a Google Workspace or Cloud Identity account), check whether that organization enforces Google's "secure by default" policies, which Google now documents as its security baseline constraints. Google enforces them on every organization created on or after May 3, 2024, and on some created between February and April 2024. Two of them block steps in this codelab:
| Policy | What it blocks | Fix in |
|---|---|---|
Disable service account key creationiam.managed.disableServiceAccountKeyCreation or iam.disableServiceAccountKeyCreation | Creating the JSON key RevenueCat needs. | Step 5 |
Domain restricted sharingiam.allowedPolicyMemberDomains | Giving Google Play's notification account publish rights on your topic. | Step 9 |
- How to check: select your project, open IAM & Admin > Organization policies, and filter for key creation and then for domain restricted sharing.
- Who can change them: only someone with the Organization Policy Administrator role (
roles/orgpolicy.policyAdmin), which Google only grants on the organization. Being the project Owner is not enough, and a Workspace super admin usually has to grant themselves this role on the organization first. - If either policy is enforced: find that person now. Steps 5 and 9 tell them exactly what to change.
3. Can the project use Pub/Sub?
Real-time developer notifications run on Cloud Pub/Sub, which is a paid product with a free tier. Google's own Pub/Sub quickstart starts with "Verify that billing is enabled for your Google Cloud project", and the free allowance is counted per billing account. If enabling the Pub/Sub API in Step 3 asks for a billing account, link one.
The first 10 GiB of Pub/Sub throughput every month is free per billing account, and each notification is billed at the 1 KB request minimum when it is published and again when it is delivered. That allowance covers several million notifications a month.
4. Are the Play Console and RevenueCat sides ready?
- A build is released to a testing track in Play Console. Upload a signed app bundle that includes the RevenueCat SDK (it bundles the Google Play Billing Library, which Play requires before you can create products), create a release on Internal testing, and roll it out. Google's API does not return details for a package until its first build is uploaded, and RevenueCat's subscription check also needs that release. The Google Play codelab explains the near-empty shell build that unblocks this early.
- You can invite users in Play Console. You need permission to manage users and permissions on the developer account, or the account owner has to do Step 6.
- You are an Admin in the RevenueCat project. Other collaborator roles get "Account permissions are invalid for this request." when uploading credentials.
- Your Google Play app exists in RevenueCat. Its package name must match your app's
applicationIdexactly. In a Flutter or React Native project that is inandroid/app/build.gradle(orbuild.gradle.kts); in Expo it isandroid.packageinapp.json.
Enable the Three APIs
0:03:00First confirm the project picker at the top of the Cloud Console shows the project from Step 2. Then open each of these API pages and click Enable. The button reads Manage when the API is already enabled.
| API | Service name | Why RevenueCat needs it |
|---|---|---|
| Google Play Android Developer API | androidpublisher.googleapis.com | Validates purchases and reads your products and subscriptions. This is the one that matters most. |
| Google Play Developer Reporting API | playdeveloperreporting.googleapis.com | Listed in RevenueCat's setup guide alongside the Android Developer API. |
| Cloud Pub/Sub API | pubsub.googleapis.com | Carries real-time developer notifications (Steps 9 and 10). |
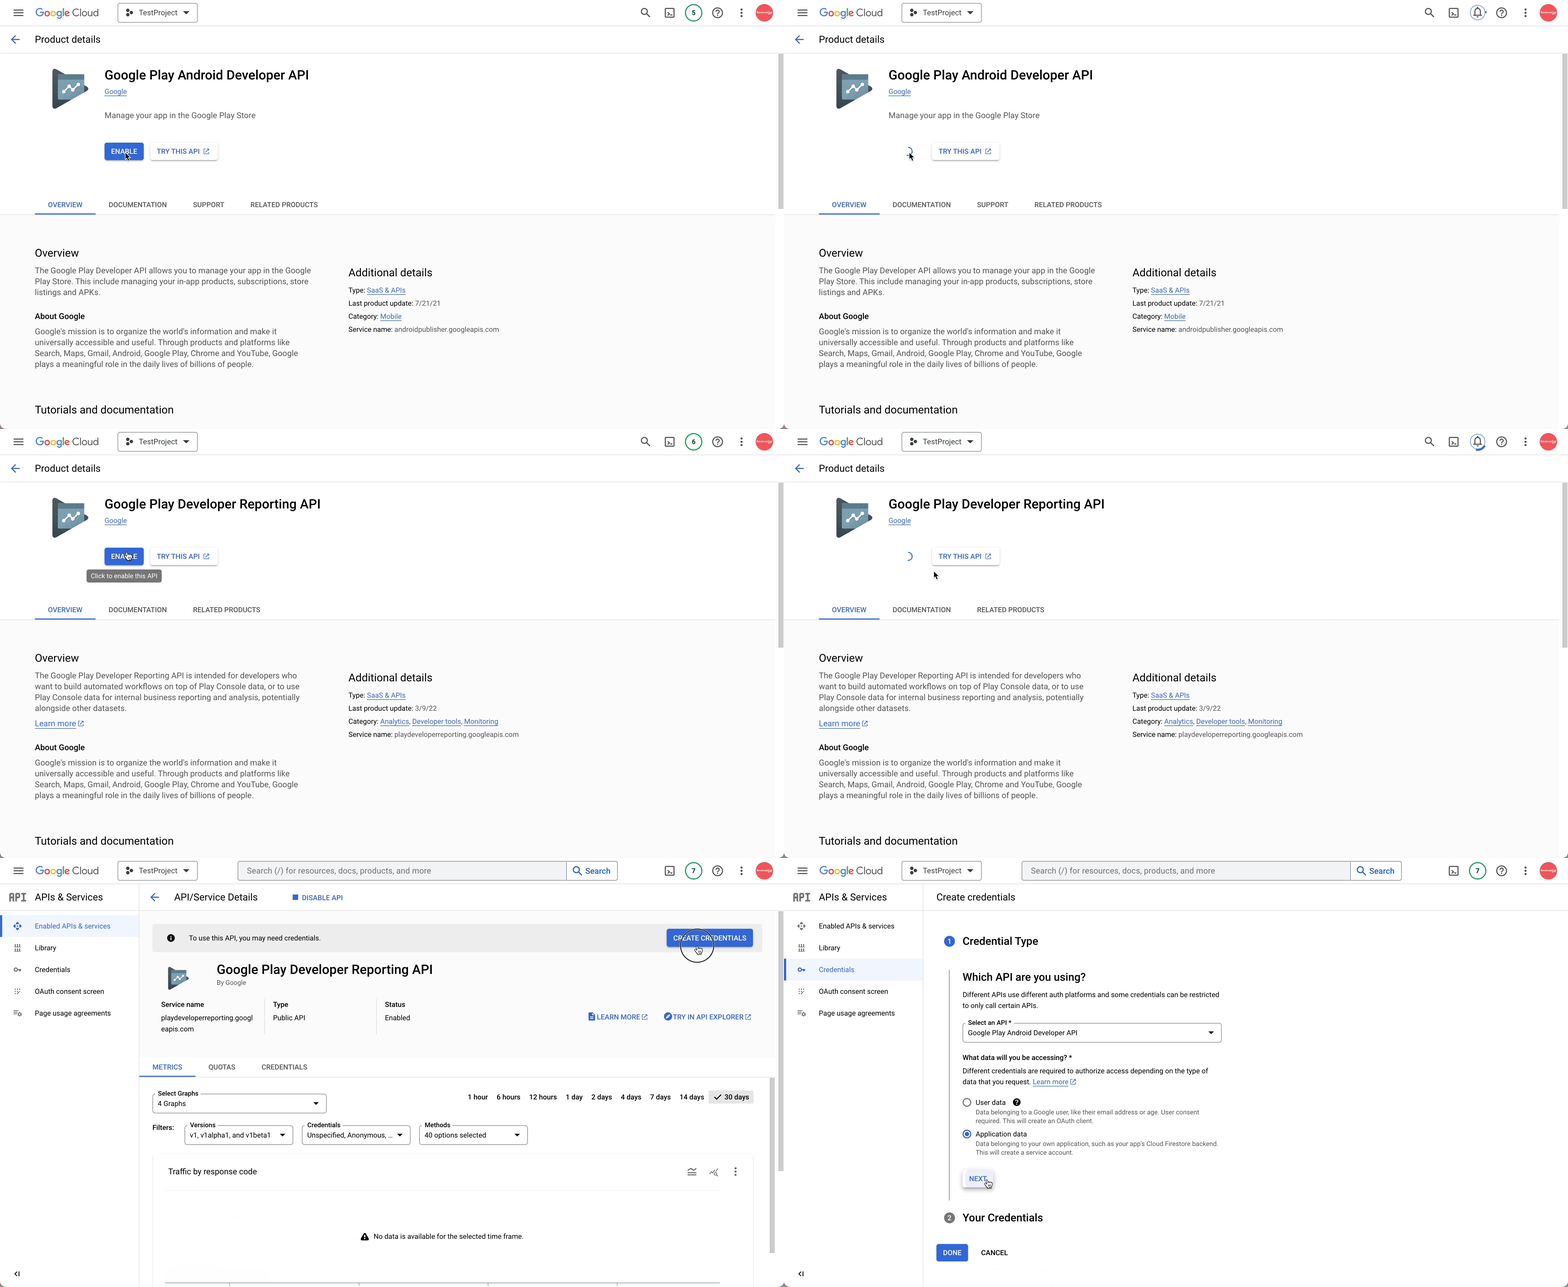
The animation enables the first two APIs; the Cloud Pub/Sub API page works the same way.
Do not skip Pub/Sub because notifications feel optional. Without it, Step 9 fails with "Google Cloud Pub/Sub API must first be enabled." Enabling it now also keeps all three APIs in the same project, which Step 9 requires.
Prefer the command line? Do Steps 3 to 5 in Cloud Shell
If you are comfortable with a terminal, the commands below do this step and the next two. Use either the Console path or this block, not both: running both fails on the create command and leaves you with a second key.
- Open the Cloud Console, click the Activate Cloud Shell icon in the top bar, and authorize Cloud Shell when it asks.
- Set
PROJECT_IDto the Project ID from Step 2. - Paste one commented section at a time and read its output before the next, so an error such as a billing prompt does not scroll past.
# Settings (paste first)
PROJECT_ID="your-project-id"   # the Project ID, not the display name
SA_NAME="revenuecat-service-account"
SA_EMAIL="${SA_NAME}@${PROJECT_ID}.iam.gserviceaccount.com"
gcloud config set project "$PROJECT_ID"

# Step 3: the three APIs, plus IAM and Resource Manager, which these commands need on a new project
gcloud services enable iam.googleapis.com cloudresourcemanager.googleapis.com \
  androidpublisher.googleapis.com playdeveloperreporting.googleapis.com pubsub.googleapis.com

# Step 4: the service account and its two project roles
gcloud iam service-accounts create "$SA_NAME" --display-name="RevenueCat Service Account"
sleep 60   # Google asks you to wait about a minute before granting roles to a new service account
gcloud projects add-iam-policy-binding "$PROJECT_ID" \
  --member="serviceAccount:${SA_EMAIL}" --role="roles/pubsub.admin" --condition=None
gcloud projects add-iam-policy-binding "$PROJECT_ID" \
  --member="serviceAccount:${SA_EMAIL}" --role="roles/monitoring.viewer" --condition=None

# Step 5: the JSON key (an organization policy can block this, see Step 5)
gcloud iam service-accounts keys create revenuecat-key.json --iam-account="$SA_EMAIL"
cloudshell download revenuecat-key.json
The last line downloads the key to your computer. If your browser blocks it, use More > Download in the Cloud Shell toolbar and enter revenuecat-key.json. Then delete the copy in Cloud Shell with rm revenuecat-key.json and continue at Step 6.
Create the Service Account
0:04:00Go to IAM & Admin > Service Accounts and check the project picker once more.
- Click Create service account.
- Enter a name such as
revenuecat-service-account. Google fills in the service account ID from it. Click Create and continue. - On Grant this service account access to project, add two roles: Pub/Sub Admin and Monitoring Viewer. Click Continue.
- Skip the optional third section and click Done.
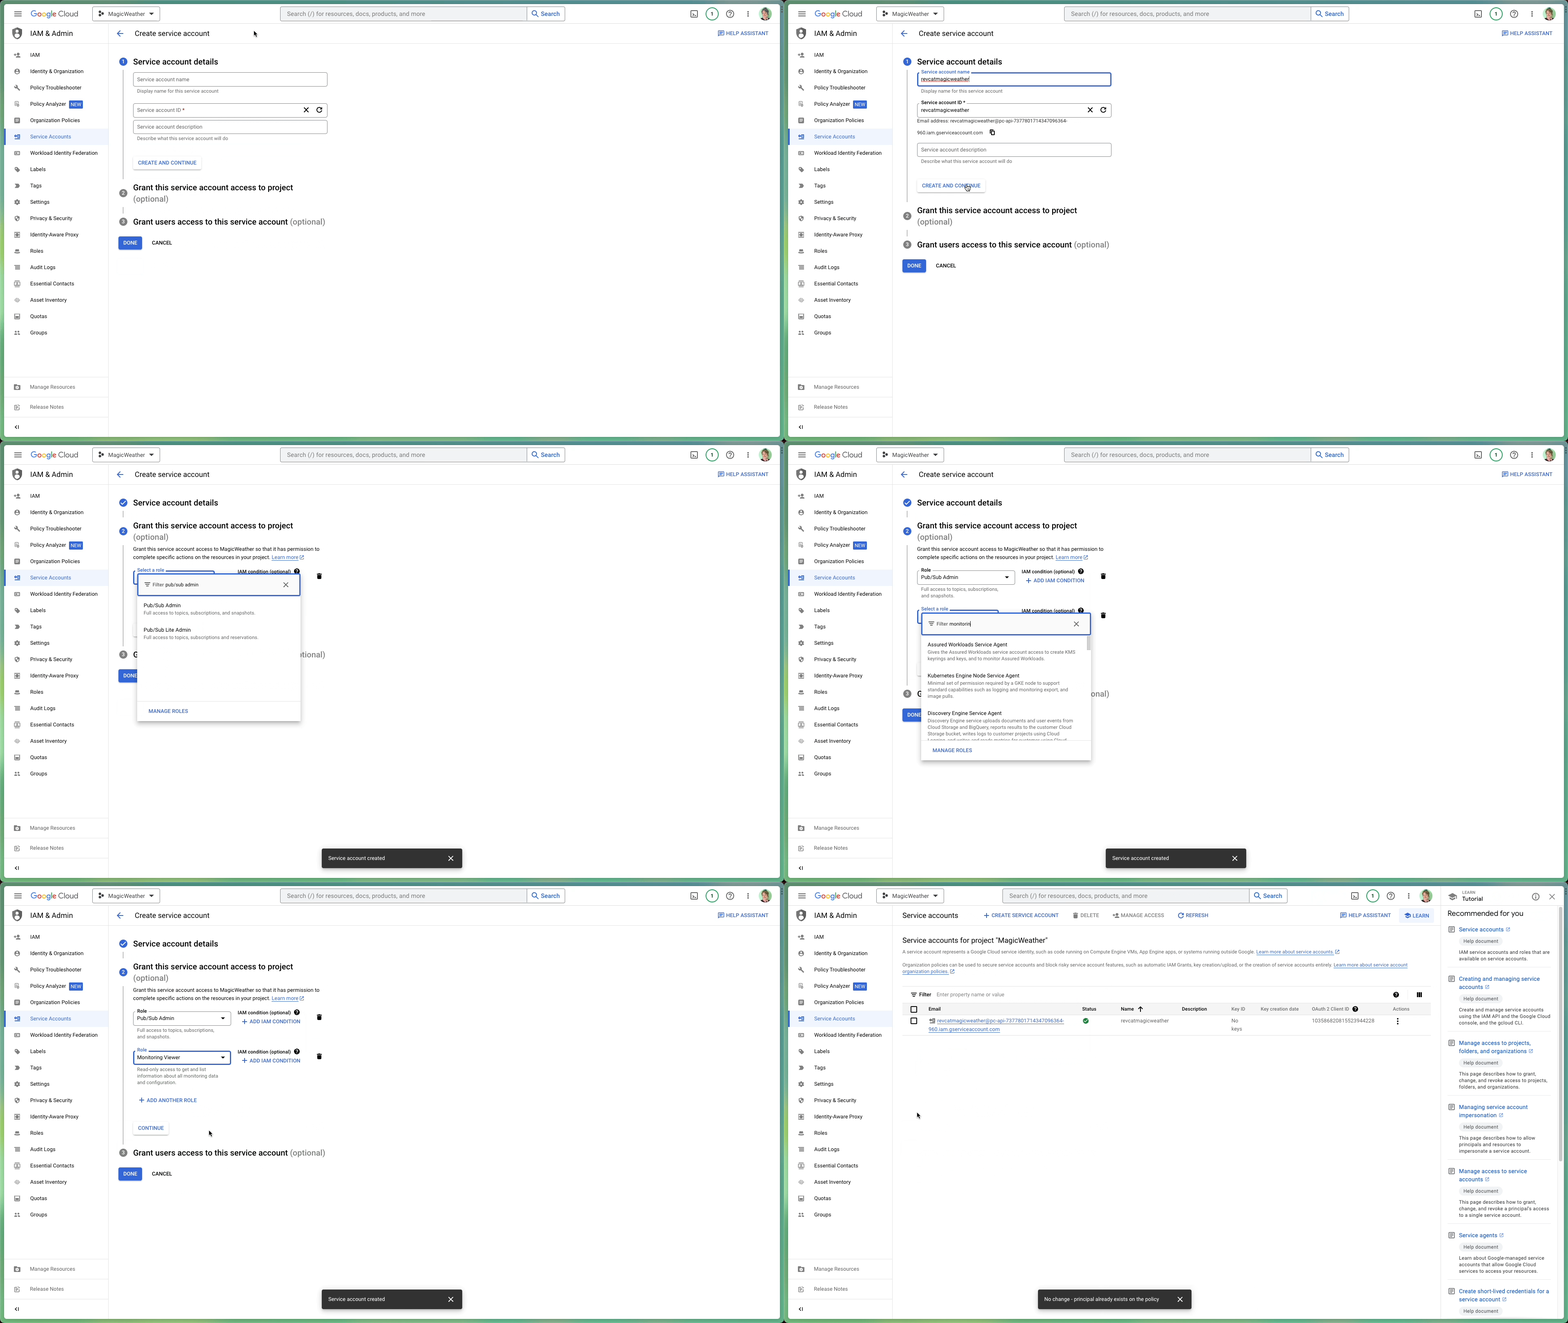
Back in the list, copy the service account's email address from the Email column. It looks like revenuecat-service-account@your-project-id.iam.gserviceaccount.com. You will paste it into Play Console in Step 6.
Why Pub/Sub Admin and not Pub/Sub Editor
RevenueCat's guide lists Pub/Sub Editor as usually enough and says to switch to Pub/Sub Admin if you hit permission errors when the topic is created. The difference is one permission. Pub/Sub Editor can create topics, but setting who may use a topic requires pubsub.topics.setIamPolicy, which, of the Pub/Sub roles, only Pub/Sub Admin includes, and Google Play needs exactly that kind of access to publish to your topic. Developers who hit "do not have permission" errors on Connect to Google report that switching to Pub/Sub Admin fixed them, so this codelab grants Admin from the start.
If your security team requires the narrower role, grant Pub/Sub Editor and expect to add Google Play's publish grant yourself in Step 9, which that step has you check in either case. If Connect to Google then reports a permission error, switch to Pub/Sub Admin and try again.
Monitoring Viewer lets RevenueCat monitor the notification queue.
If something does not go to plan
- The role filter finds nothing. The search does not always surface both roles. Browse instead: Pub/Sub Admin is in the Pub/Sub folder, and Monitoring Viewer is in the Monitoring folder. One developer could only find Monitoring Viewer after switching the console language to English.
- You skipped the roles. You do not need a new service account. Open IAM & Admin > IAM, click Grant access, paste the service account email under New principals, add both roles, and click Save.
- Creating the service account is blocked by an organization policy. RevenueCat's docs name
iam.disableServiceAccountCreationas a possible default constraint. The fix is the same as for key creation in Step 5, applied to the policy named Disable service account creation.
Create the JSON Key
0:04:00- In Service Accounts, open the Actions menu (three dots) next to your service account and choose Manage keys.
- Click Add key > Create new key.
- Keep JSON selected and click Create. The key file downloads to your computer.
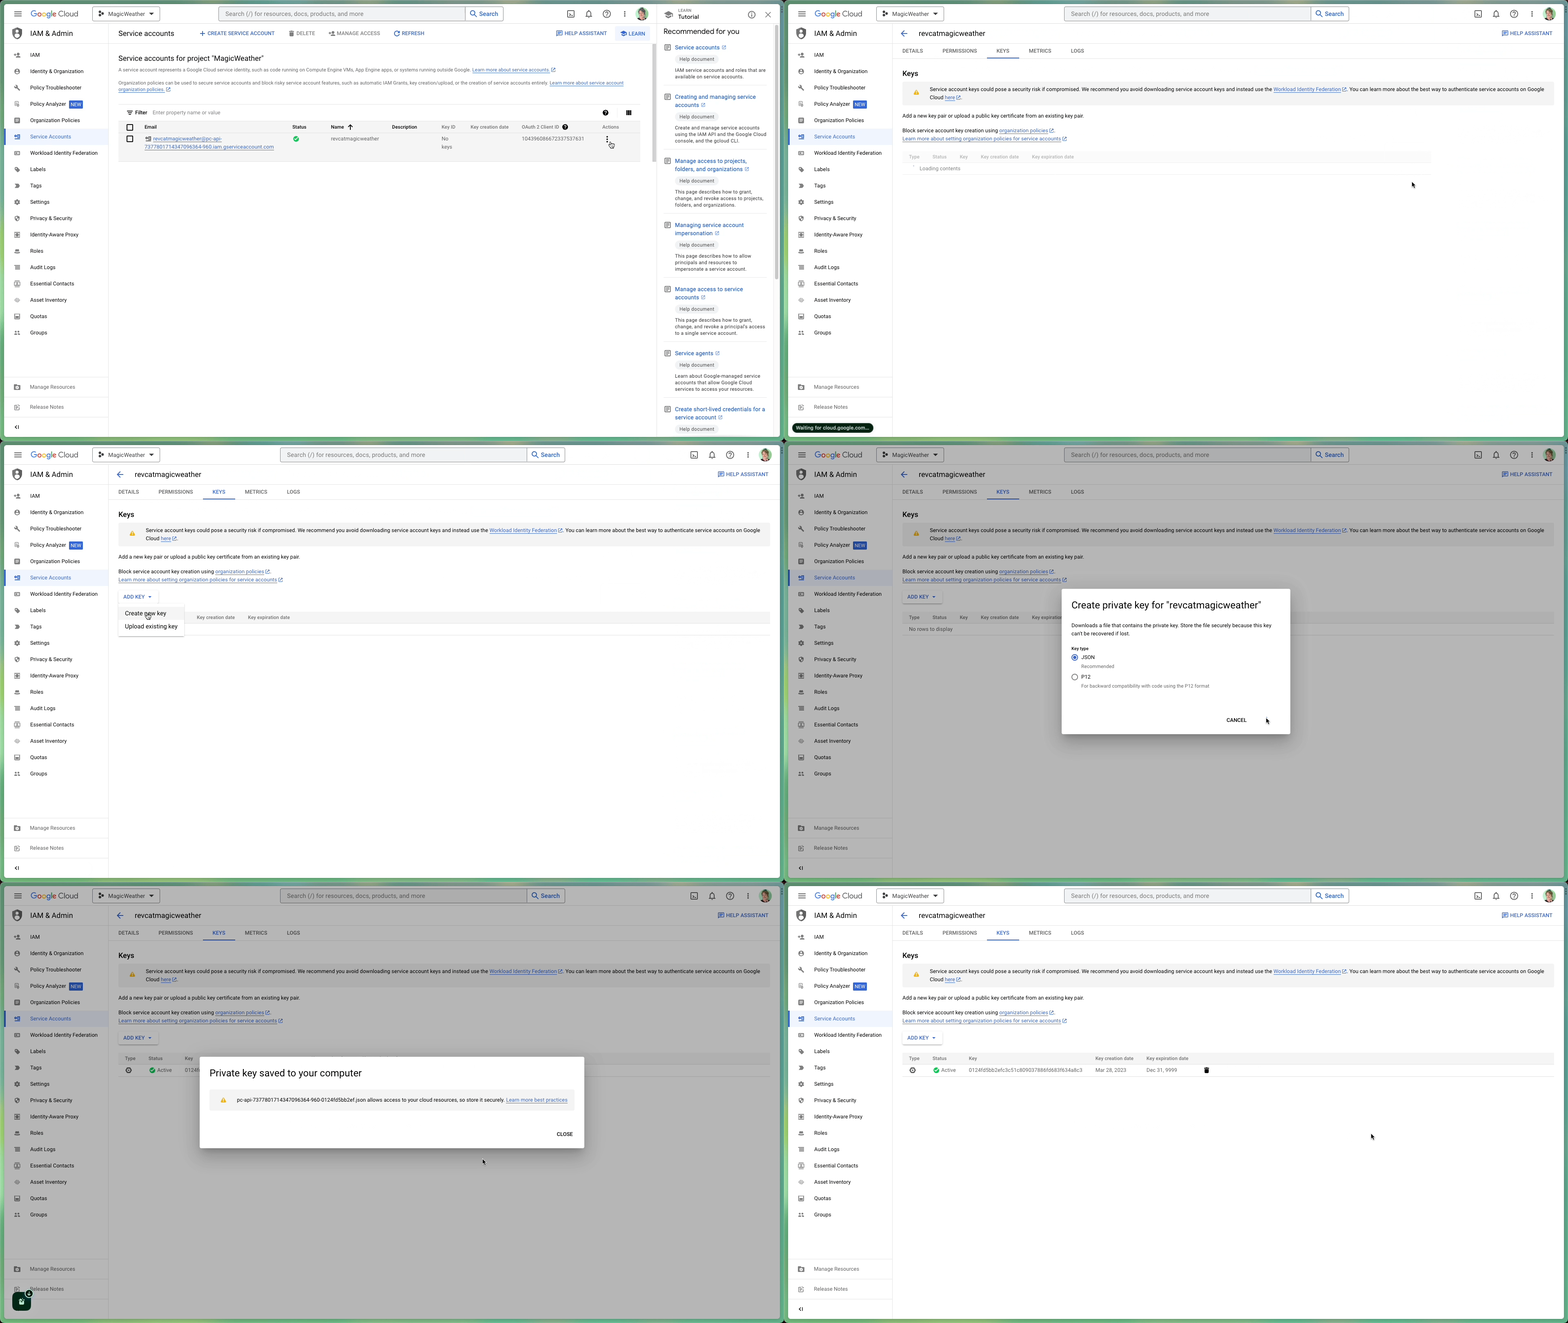
The file is the credential. Preview it once, without saving, to confirm it is the right kind of file: it must contain "type": "service_account", and its client_email must be the email you copied in Step 4.
If you see "Service account key creation is disabled"
The Console shows a dialog titled Service account key creation is disabled, with text like "An Organization Policy that blocks service accounts key creation has been enforced on your organization." In Cloud Shell the same block reads:
ERROR: (gcloud.iam.service-accounts.keys.create) FAILED_PRECONDITION: Key creation is not allowed on this service account.This is the secure-by-default policy from Step 2. Keep these points in mind:
- Google documents two constraints for it: a managed one (
iam.managed.disableServiceAccountKeyCreation) and a legacy one (iam.disableServiceAccountKeyCreation). Either one blocks you. - Relax every one that is enforced. Turning off only the managed one while the legacy one stays inherited leaves you blocked.
- Only someone with Organization Policy Administrator on the organization can make the change.
That person does this:
- Select your project in the project picker and open IAM & Admin > Organization policies.
- Filter for service account key creation and open each matching policy that is enforced.
- Click Manage policy, choose Override parent's policy, click Add a rule, set Enforcement to Off, and click Set policy.
- Wait a few minutes (policy changes can take up to 15 minutes) and create the key again.
The same change in Cloud Shell:
PROJECT_ID="your-project-id"

# Legacy constraint
gcloud resource-manager org-policies disable-enforce \
  iam.disableServiceAccountKeyCreation --project="$PROJECT_ID"

# Managed constraint
cat > key-policy.yaml <<EOF
name: projects/${PROJECT_ID}/policies/iam.managed.disableServiceAccountKeyCreation
spec:
  rules:
  - enforce: false
EOF
gcloud org-policies set-policy key-policy.yamliam.serviceAccountKeyExpiryHours, at most 90 days), the key stops working when it expires, so credentials that used to work turn invalid weeks later. Check the Key expiration date column on the Keys tab.Invite It in Play Console
0:05:00Your service account exists, but Google Play does not know about it yet. This step is where it gets access to your app's data, and it happens entirely in Play Console, not in Cloud IAM.
- Open Google Play Console and click Users and permissions in the left navigation of All apps. This is the account-level page, not a page inside one app. Click Invite new users.
- In Email address, paste the service account email. It is the
client_emailvalue in your JSON key. Paste it rather than typing it, and do not use your own Google account email. - On the App permissions tab, add the app RevenueCat should access.
- On the Account permissions tab, grant the four permissions in the table below.
- Click Invite user and confirm. A service account does not need to accept the invitation; it shows up in the users list as active.
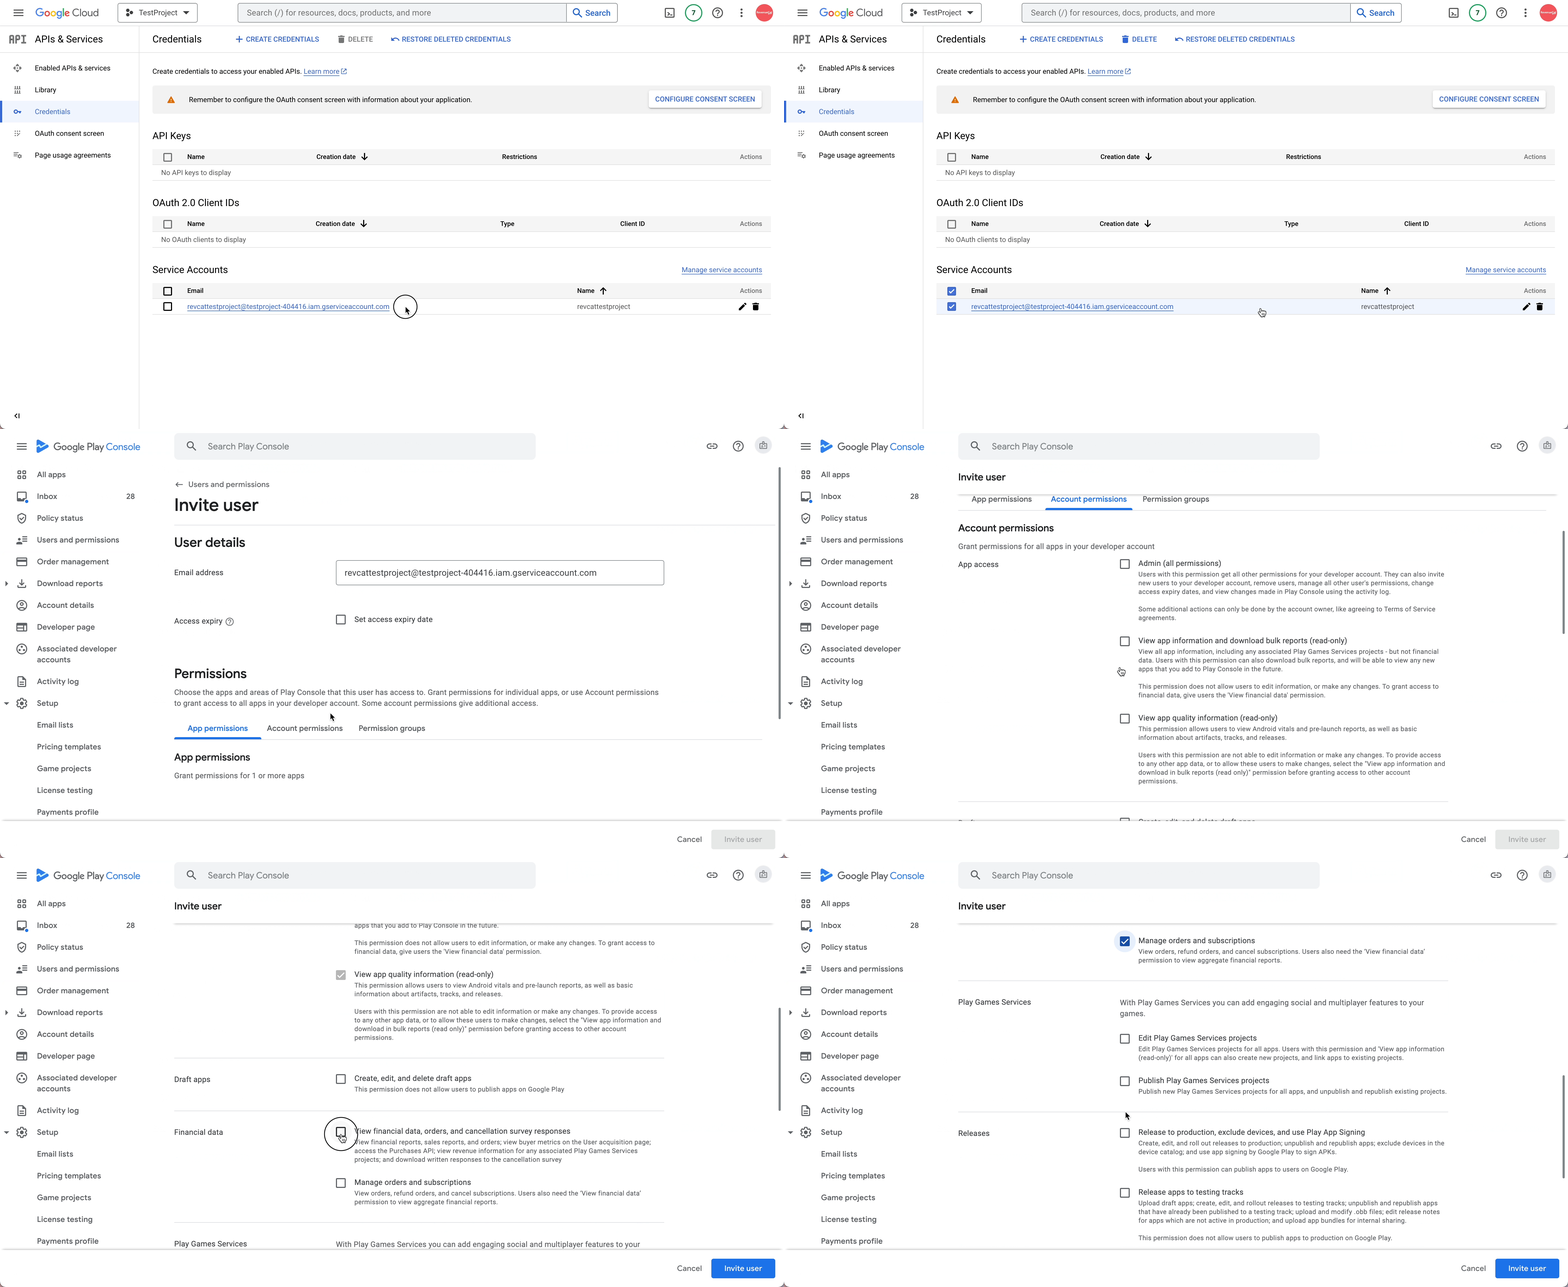
The animation copies the email from APIs & Services > Credentials, which lists the same address as the Service Accounts page, and skips the App permissions tab.
| Account permission | What RevenueCat uses it for |
|---|---|
| View app information and download bulk reports (read-only) | Reads your app and in-app product details. |
| View financial data, orders, and cancellation survey responses | Validates purchases and reads order data. |
| Manage orders and subscriptions | Manages subscriptions, for example refunds and deferrals. |
| Manage store presence | Creates and updates products in Google Play from RevenueCat, for example with the Product Editor, the MCP server, or the AI Toolkit. Find it under the Store presence category. |
- Forgot one? Open the service account in Users and permissions, enable the missing permission, and save. You do not need to re-invite it or create a new key.
- Following an older guide that says Setup > API access? That page is gone from current consoles, and there is nothing to link. Inviting the email here is the whole connection.
Upload the Key to RevenueCat
0:04:00- In the RevenueCat dashboard, open your project's apps list (Apps & providers, or Apps under Project settings in older dashboards) and select your Google Play app.
- Check Google Play package. It must match your app's
applicationIdand the package in Play Console character for character, for examplecom.example.myapp. - Drop the JSON key into Service Account Credentials JSON, or click to select it.
- Click Save changes. The upload is not stored until you save.
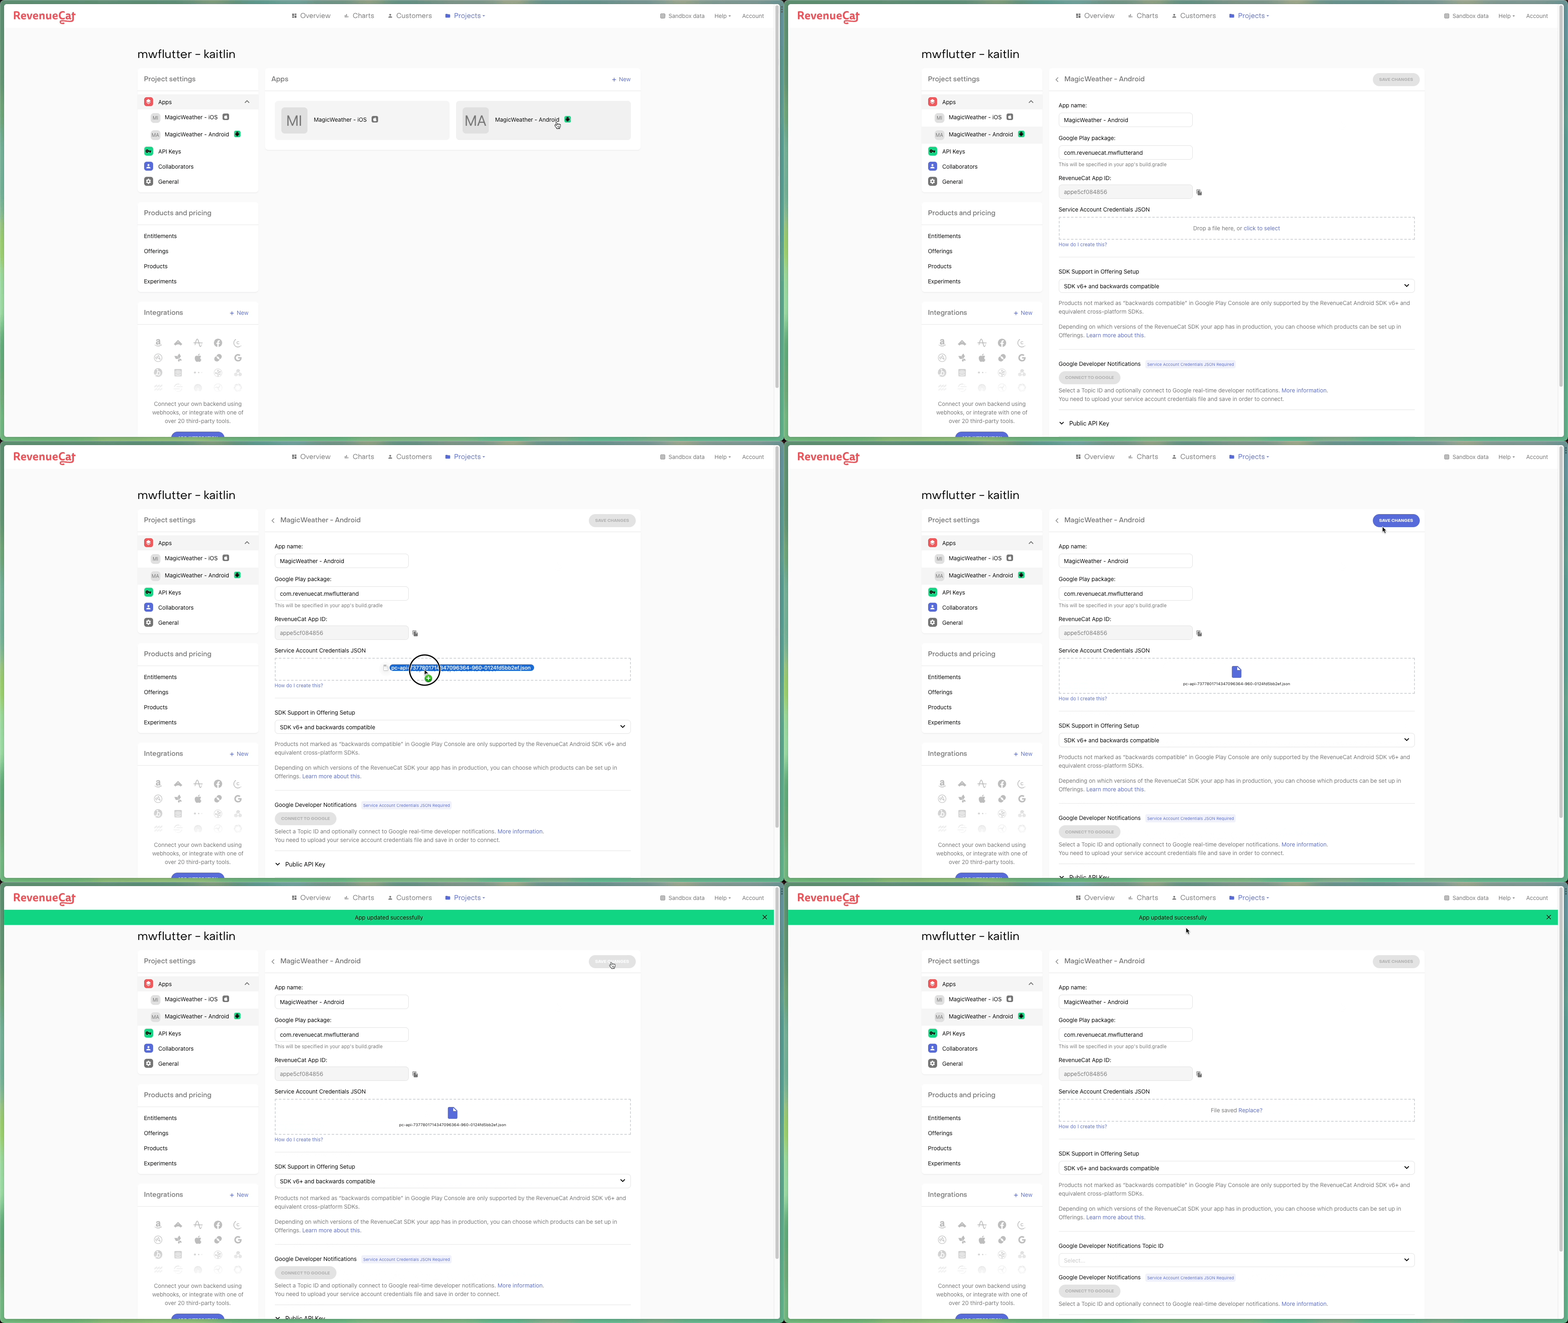
Read the validation checks
RevenueCat validates the credentials every time you upload them. A status label appears under the file, such as Valid credentials, and the refresh icon next to it runs the checks again.

Click the status label to open Credentials Validation Details. It shows the Project ID, Private Key ID, and Client Email from the file you uploaded, followed by each check. Compare the client email with the account you invited in Step 6: if they differ, you uploaded the wrong file. Older dashboards, like the one in these screenshots, show only the list of checks in a popup:
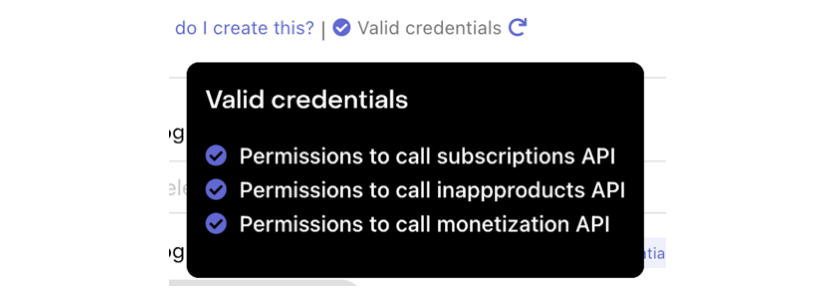
Each check calls one Google endpoint. Current dashboards use the first label below; older dashboards use the second. A failing check tells you what to fix:
| Check | It fails when | Fix |
|---|---|---|
| Can validate Google Play subscription purchases older: Permissions to call subscriptions API | View financial data or Manage orders and subscriptions is missing, no build has been released to a testing track, or Google has not finished propagating. | Check Step 6 and the release from Step 2, then see Step 8. |
| Can read the Google Play in-app product catalog older: Permissions to call inappproducts API | View app information and download bulk reports is missing, or the Google Play Android Developer API is not enabled. | Check Step 6 and Step 3. |
| Can read the Google Play subscription catalog and base plans older: Permissions to call monetization API | View financial data is missing, or the Google Play Android Developer API is not enabled. | Check Step 6 and Step 3. |
Older dashboards also show a yellow Credentials need attention label when any check fails. Right after a first upload, failing checks are normal. Go to the next step before you change anything.
The 36-Hour Wait
0:03:00New Play service credentials can take up to 36 hours to work with the Google Play Developer API. Until then, red checks and "Invalid Play Store credentials" errors (HTTP 503 or 521) are expected and do not mean your setup is wrong. In the SDK this shows up as an InvalidCredentialsError (code 11) whose underlying message is "Invalid Play Store credentials." The same error code with "Invalid API Key" means something else entirely; see the Error Lookup Table. The wait was the most frequently reported issue we found in RevenueCat Community, usually from developers who had done everything right.
Two ways to make it faster
- Edit a product. In Play Console, open your app, go to Monetize with Play > Products, open any subscription or one-time (in-app) product, change its description, and save. This often activates new credentials right away or very shortly after. Revert the description afterward. It is not guaranteed, but it has worked for many developers. No product yet? Create one first, as the Google Play codelab shows.
- Make a test purchase. The subscription check depends on a build released to a testing track, and developers whose subscription check stayed red well past 36 hours fixed it by releasing a build and buying with a license tester. Test In-App Purchases in the Google Play Sandbox walks through it.
What not to do while you wait
- Do not create a new service account to "reset" things. A new account has to be invited and propagate too, so you restart the clock.
- Re-uploading the same JSON does not speed anything up. It is still useful to rule out a wrong file, and the refresh icon re-runs the checks at any time.
Create the Topic and Grant Access
0:05:00RevenueCat works with service credentials alone, but real-time developer notifications are strongly recommended. They speed up webhooks and integrations, improve price accuracy, and reduce the lag in Charts. If you sell one-time products, they also make refunds and voids show up automatically; without them, a refund might only appear after the customer opens the app again.
This step follows Google's documented order: create the topic and give Google Play permission to publish to it first, then point Play Console at it in Step 10.
In RevenueCat: create the topic
- On the same Google Play app page, find Google Developer Notifications, just below the JSON field. It works only once the JSON from Step 7 is saved.
- In the Topic ID dropdown, let RevenueCat create a new topic rather than picking an existing one. The Connect to Google button stays greyed out until you choose an option in that dropdown, so choose the one that creates a new topic. (RevenueCat asks you to contact support if you need to use a Pub/Sub topic you already have.)
- Click Connect to Google. RevenueCat creates the topic in your project and shows its full name, for example
projects/your-project-id/topics/Play-Store-Notifications. If nothing appears, refresh the page. Copy the whole value, and do not continue until you have it.
If Connect to Google fails
| What you see | Fix |
|---|---|
| The button stays greyed out. | Save the JSON in Step 7, refresh the page, and choose the option to create a new topic in the Topic ID dropdown. |
| "Google Cloud Pub/Sub API must first be enabled." | Enable the Cloud Pub/Sub API in the same project as the service account (Step 3). |
| "...do not have permissions to access the Google Cloud Pub/Sub API." or "...do not have permission to create a Google Cloud Pub/Sub topic" | The service account is missing its Pub/Sub role, has Cloud Pub/Sub Service Agent instead, or has Pub/Sub Editor where Admin is needed. Grant Pub/Sub Admin (Step 4). RevenueCat's troubleshooting guide says to re-generate the JSON key and upload it again after changing roles, then try Connect to Google again. |
| A server error, or "One or more users named in the policy do not belong to a permitted customer" in Cloud logs. | Domain restricted sharing is blocking Google Play's account. Apply the fix below; it has you click Connect to Google again while the policy is lifted. |
In Google Cloud: check Google Play's publish rights
Google Play publishes notifications as google-play-developer-notifications@system.gserviceaccount.com, and that account needs the Pub/Sub Publisher role on your topic. Check it even if Connect to Google succeeded. It takes a minute, and a missing grant is the most common reason the test notification in Step 10 fails.
- Open Pub/Sub > Topics in the same project.
- Select the topic RevenueCat created (for example
Play-Store-Notifications) and open its Permissions. Depending on the console version, that is a tab on the topic page or the info panel to the right of the list. - Look for
google-play-developer-notifications@system.gserviceaccount.comunder Pub/Sub Publisher. If it is missing, click Add principal, paste that address, choose the role Pub/Sub Publisher, and click Save.
Or in Cloud Shell, with TOPIC_ID set to the last part of the topic name RevenueCat showed you:
PROJECT_ID="your-project-id"
TOPIC_ID="Play-Store-Notifications"   # the part after /topics/

gcloud pubsub topics add-iam-policy-binding "$TOPIC_ID" \
  --project="$PROJECT_ID" \
  --member="serviceAccount:google-play-developer-notifications@system.gserviceaccount.com" \
  --role="roles/pubsub.publisher"
If Google Cloud refuses to add Google Play's account
The Console shows an "IAM policy update failed" message. Depending on the console version, it says that a domain restriction organization policy is in place, or that "The 'Domain Restricted Sharing' organization policy (constraints/iam.allowedPolicyMemberDomains) is enforced", and that only principals in allowed domains can be added. In Cloud Shell the error is:
FAILED_PRECONDITION: One or more users named in the policy do not belong to a permitted customer.This is Domain restricted sharing (iam.allowedPolicyMemberDomains), enforced by default with only your own domain allowed for every organization created on or after May 3, 2024. Google Play's account lives in system.gserviceaccount.com, outside your domain. Google's documentation for this policy lists exactly this account, for "Use Pub/Sub to receive real-time developer notifications from Google Play", among the accounts that need an exception. Google does not document a customer ID for it, so adding one to the allowed list is not an option.
For the default (legacy) constraint, Google's documented fix is to "force account access": lift the policy for your project, grant the role, and put the policy back. The person with Organization Policy Administrator on the organization does this:
- With your project selected, open IAM & Admin > Organization policies and open Domain restricted sharing.
- Click Manage policy and choose Override parent's policy. Under Policy enforcement, select Replace. Click Add a rule, set Policy values to Allow All, and click Set policy.
- Wait a few minutes (up to 15). If Connect to Google failed earlier, click it again now so the topic exists, then add the Publisher grant above.
- Return to the policy, click Manage policy, choose Inherit parent's policy, and click Set policy. The grant you just made stays in place.
iam.managed.allowedPolicyMembers), you do not need to lift anything. Add serviceAccount:google-play-developer-notifications@system.gserviceaccount.com to its allowed members, which is the exception Google recommends for this account.Point Google Play at It and Test
0:05:00In Play Console: set the topic
- Open your app and go to Monetize with Play > Monetization setup (older consoles label the section Monetize).
- Under Real-time developer notifications, check Enable real-time notifications if your console shows that checkbox.
- Paste the full topic name from Step 9 into Topic name. Play Console expects the format
projects/{project_id}/topics/{topic_name}, so the topic ID alone is rejected. - For Notification content, choose Subscriptions, voided purchases, and all one-time products. The other option, Subscriptions and voided purchases only, leaves out one-time product purchase events.
- Click Save changes.
Send a test notification
- On the same Monetization setup page, click Send test notification below the topic name. (Google's documentation calls it Send Test Message.)
- Back in RevenueCat, refresh your Google Play app page. Next to the topic ID, No notifications received should change to Last received with a current timestamp.
If the test does not arrive
- Play Console says "Please verify if the topic name has been entered in the correct format, if Google Cloud has been properly configured, and if you have the necessary permissions." Check that the topic name is the full
projects/.../topics/...value, that the Publisher grant from Step 9 exists, and that the topic is in the project RevenueCat shows. - The test succeeds in Play Console, but RevenueCat still shows No notifications received after a refresh. Compare the topic name in Play Console with the one RevenueCat shows. A topic left over from an earlier attempt is an easy mismatch to miss. If they match, contact RevenueCat support.
Error Lookup Table
0:06:00Search this page for the exact text you see (Ctrl+F or Cmd+F). Each row names the cause and links to the step with the fix.
Service credentials
| Message or symptom | Cause | Fix |
|---|---|---|
"Invalid Play Store credentials" (503 or 521), or an SDK InvalidCredentialsError (code 11) with that underlying message | Inside the first 36 hours: propagation. After that: a configuration gap below. | Step 8, then the rows below. |
| "There was a credentials issue" with "Invalid API Key" (code 11) | Not Google at all: the RevenueCat public SDK key is wrong, often the iOS key in an Android build. | Use the Google Play app's public SDK key (it starts with goog_) in your SDK configuration. |
| Subscription check fails ("Could not validate subscriptions API permissions", "Permissions to call subscriptions API") while the other checks pass | Missing View financial data or Manage orders and subscriptions, no build released to a testing track, or propagation. | Step 6 and the release in Step 2, then Step 8. |
| "Could not validate inappproducts and monetization API permissions" | The Google Play Android Developer API is not enabled (often only the Reporting API was), or View app information or View financial data is missing. | Step 3, then Step 6. |
| "Credentials need attention" | At least one validation check is failing. | Open the details and use the table in Step 7. |
| "The provided Google Service Account credentials JSON is invalid." | The file was edited, or it is not a service account key. | Create a fresh key and upload it unmodified (Step 5). |
| "Your Google Service Account credentials do not have permissions to access the needed Google resources." | The service account is missing its Pub/Sub role or Monitoring Viewer. | Add the roles (Step 4), then re-generate the JSON key and upload it again, as RevenueCat's troubleshooting guide says. |
| "Google Play service account credentials must be set up before using this feature." | An action that talks to Google, such as importing products, ran before a JSON was saved. | Step 7 |
| "Account permissions are invalid for this request." | Your RevenueCat collaborator role is not Admin. | Ask a project Admin to upload the key or change your role. |
| RevenueCat cannot find your package name | No build uploaded yet, or the package does not match applicationId. | Release a build to a testing track and match the package exactly (Step 2). |
| Credentials that worked turn invalid weeks later | The key was deleted, it expired under a key expiry policy, or Google disabled it after finding it exposed. | Check the Keys tab. Create a new key and upload it (Step 5). |
| The service account shows as Disabled | Someone with access to the project disabled it. | Find out why before you re-enable it. RevenueCat recommends creating new credentials instead when an account may have been disabled for a security reason. |
Google Cloud and Play Console
| Message or symptom | Cause | Fix |
|---|---|---|
| "Service account key creation is disabled" or "Key creation is not allowed on this service account." | Secure-by-default organization policy. | Step 5 |
| Creating the service account fails with an organization policy error | iam.disableServiceAccountCreation is enforced. | Same fix as key creation, for Disable service account creation (Step 4). |
| Cannot create more keys | A service account can have at most 10 keys. | Delete unused keys on the Keys tab. |
| Pub/Sub Admin or Monitoring Viewer does not appear in the role picker | The search filter misses them. | Browse the Pub/Sub and Monitoring folders, or use IAM > Grant access (Step 4). |
| "Setup > API access" page is missing, or a guide says to link your Cloud project | Google removed the linking requirement. | Nothing to link. Invite the email (Step 6). |
| Enabling Pub/Sub asks for a billing account | Pub/Sub expects billing on the project. | Link a billing account; typical volume stays in the free tier (Step 2). |
Real-time developer notifications
| Message or symptom | Cause | Fix |
|---|---|---|
| Connect to Google stays greyed out | No saved JSON yet, or nothing chosen in the Topic ID dropdown. | Save the JSON (Step 7), refresh, and choose the option to create a new topic (Step 9). |
| "Google Cloud Pub/Sub API must first be enabled." | Pub/Sub is off in the service account's project. | Step 3 |
| "...do not have permissions to access the Google Cloud Pub/Sub API." or "...do not have permission to create a Google Cloud Pub/Sub topic" | Missing or wrong Pub/Sub role on the service account. | Grant Pub/Sub Admin (Step 4) and retry (Step 9). |
| Server error on Connect to Google, or "One or more users named in the policy do not belong to a permitted customer" | Domain restricted sharing. | Step 9 |
| "IAM policy update failed", "domain restriction organization policy", or "The 'Domain Restricted Sharing' organization policy (constraints/iam.allowedPolicyMemberDomains) is enforced" | Domain restricted sharing. | Step 9 |
| Play Console test: "Please verify if the topic name has been entered in the correct format..." | The topic name is not the full path, the Publisher grant is missing, or the topic does not exist. | Step 9 and Step 10 |
| Test succeeds in Play Console, but RevenueCat shows "No notifications received" | Play Console points at a different topic than the one RevenueCat connected, or the page was not refreshed. | Match the topic names exactly (Step 10). |
Still stuck? RevenueCat's credentials troubleshooting guide and the RevenueCat Community are the next places to look. Include the exact message and which check fails when you ask.
Final Checklist
0:03:00When every item below is true, the Google side of your integration is done.
Google Cloud
- One project holds the APIs, the service account, and the Pub/Sub topic.
- The Google Play Android Developer API, the Google Play Developer Reporting API, and the Cloud Pub/Sub API are enabled.
- The service account has Pub/Sub Admin (or Pub/Sub Editor) and Monitoring Viewer.
- Its JSON key is downloaded, unmodified, and stored somewhere safe.
google-play-developer-notifications@system.gserviceaccount.comhas Pub/Sub Publisher on the topic.
Google Play Console
- The service account is in Users and permissions with the four account permissions and your app added.
- A build is released to a testing track.
- Monetization setup has the full topic name, the notification content that includes one-time products, and saved changes.
- A test notification was sent successfully.
RevenueCat
- The Google Play package matches your
applicationId. - The JSON is saved and shows Valid credentials, with every check passing.
- Google Developer Notifications shows the topic and a recent Last received timestamp.
What's next
- RevenueCat Google Play Integration: import products and set up entitlements, offerings, and paywalls.
- Test In-App Purchases in the Google Play Sandbox: make a license tester purchase and see it in RevenueCat.
- Google Play troubleshooting: product, testing, and cache issues beyond the Google Cloud setup.
- App-side integration: Android, Kotlin Multiplatform, Flutter, or React Native.